Lesson 1 - Initialize canvas
In this lesson you will learn the following:
- Hardware abstraction layers(HAL) based on WebGL1/2 and WebGPUs
- Designing our Canvas API
- Implementing a simple plug-in system
- Implementing a rendering plugin based on the HAL
When you start the project you will see an empty canvas and you can change the aspect or switch between WebGL and WebGPU renderers.
width = Inputs.range([50, 300], { label: 'width', value: 100, step: 1 });height = Inputs.range([50, 300], { label: 'height', value: 100, step: 1 });renderer = Inputs.select(['webgl', 'webgpu'], { label: 'renderer' });(async () => {
const { Canvas } = Lesson1;
const $canvas = document.createElement('canvas');
$canvas.style.outline = 'none';
$canvas.style.padding = '0px';
$canvas.style.margin = '0px';
$canvas.style.border = '1px solid black';
const canvas = await new Canvas({
canvas: $canvas,
renderer,
shaderCompilerPath:
'https://unpkg.com/@antv/[email protected]/dist/pkg/glsl_wgsl_compiler_bg.wasm',
}).initialized;
const resize = (width, height) => {
const scale = window.devicePixelRatio;
$canvas.width = Math.floor(width * scale);
$canvas.height = Math.floor(height * scale);
$canvas.style.width = `${width}px`;
$canvas.style.height = `${height}px`;
canvas.resize(width, height);
};
resize(width, height);
const animate = () => {
canvas.render();
requestAnimationFrame(animate);
};
animate();
return $canvas;
})();Hardware abstraction layers
I want the canvas to use more low-level rendering APIs like WebGL and WebGPU, the successor to WebGL, which has a lot of feature enhancements, see From WebGL to WebGPU:
- The underlying is based on a new generation of native GPU APIs, including Direct3D12 / Metal / Vulkan and more.
- Stateless API, no more unmanageable global state.
- Compute Shader support.
- There is no longer a limit to the number of contexts created per
<canvas>. - Developer experience improvements. Includes friendlier error messages and custom labels for GPU objects.
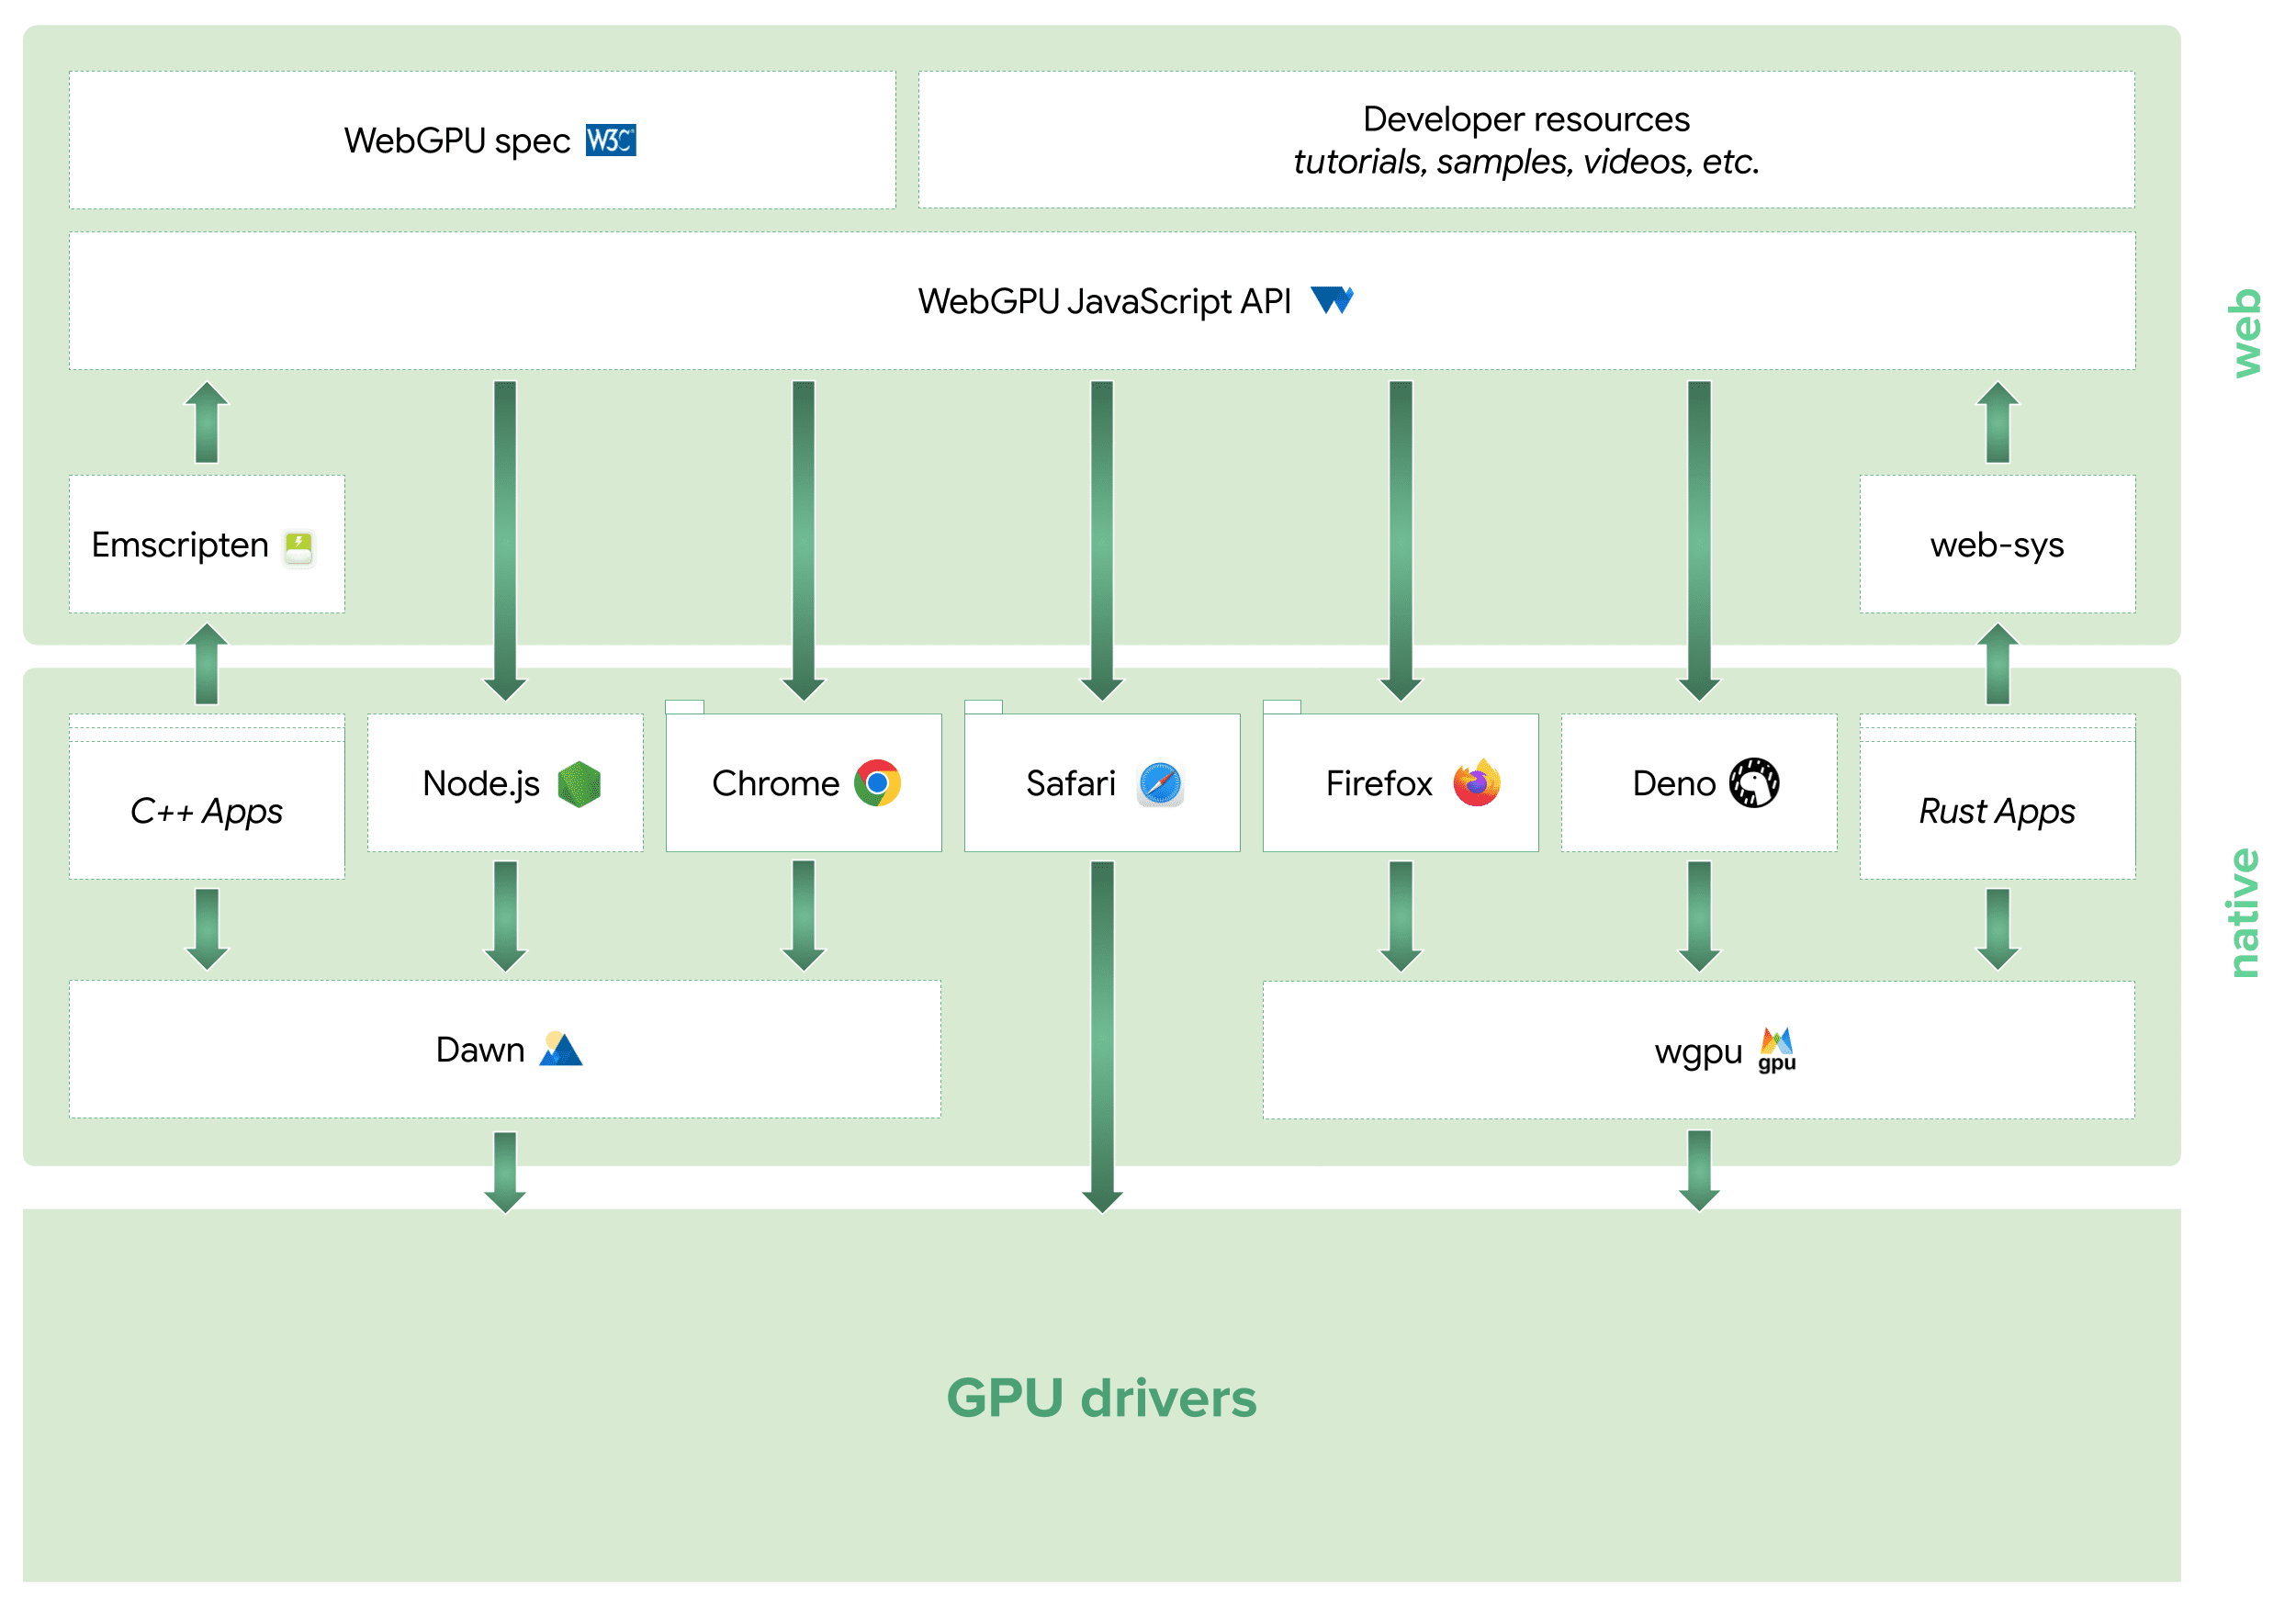
The WebGPU ecosystem now extends into JavaScript, C++, and Rust, and a number of web-side rendering engines (e.g. Three.js, Babylon.js) are in the process of, or have completed, accessing it. A special mention goes to wgpu, which in addition to the game engine bevy, has also been used in production by web-based creative design tools like Modyfi, and has performed very well. The image below is from: WebGPU Ecosystem
Of course, given browser compatibility, we still need to be as compatible as possible with WebGL1/2. In the rendering engine, the Hardware Abstraction Layer (HAL) abstracts the details of the GPU hardware, allowing the upper layers to be independent of the specific hardware implementation.
We hope to provide a unified set of APIs based on WebGL1/2 and WebGPU as much as possible, along with Shader translation and modularization. The @antv/g-device-api implementation references noclip and builds on it to be compatible with WebGL1, which we also use in some of our visualization-related projects.
Since WebGL and WebGPU use different shader languages, and we don't want to maintain two sets of code, GLSL and WGSL, we choose to translate the shader at runtime:
All that is needed in the project is to maintain a set of shaders using GLSL 300 syntax, keyword replacements when downgrading to WebGL1, and conversion to GLSL 440 before handing it over to a WASM-formatted compiler (using naga and naga-oil) into WGSL.
The following shows the attribute declarations commonly used in the Vertex Shader. This is a very simple scenario, and the syntax actually varies a lot when it comes to the texture sampling part.
// GLSL 300
layout(location = 0) in vec4 a_Position;

// compiled GLSL 100
attribute vec4 a_Position;

// compiled GLSL 440
layout(location = 0) in vec4 a_Position;

// compiled WGSL
var<private> a_Position_1: vec4<f32>;
@vertex
fn main(@location(0) a_Position: vec4<f32>) -> VertexOutput {
    a_Position_1 = a_Position;
}
Well, enough about the hardware abstraction layer, if you are interested in the implementation details you can directly refer to the @antv/g-device-api source code. We will use some of this API in the last subsection of this lesson.
Design the canvas API
Finally we get to the design part of our canvas API. The simple usage we're looking forward to is as follows:
- Pass in an HTMLCanvasElement
<canvas>to do the work of creating and initializing the canvas, including the creation of the Device (an abstract instance of the GPU) using the hardware abstraction layer. - Create a rendering loop that keeps calling the canvas rendering methods.
- Support for resizing the canvas, e.g. in response to the
resizeevent. - Destroy itself at proper time.
const canvas = new Canvas({
    canvas: $canvas,
});

const animate = () => {
    requestAnimationFrame(animate);
    canvas.render();
};
animate();

canvas.resize(500, 500);
canvas.destroy();
The use of render loops is very common in rendering engines such as Rendering the scene in Three.js.
It looks like a very simple interface definition, but let's not rush to implement it yet, because there is an asynchronous initialization problem here.
interface Canvas {
    constructor(config: { canvas: HTMLCanvasElement });
    render(): void;
    destroy(): void;
    resize(width: number, height: number): void;
}
Asynchronous initialization
This is also a significant difference between WebGPU and WebGL. In WebGL, obtaining the context is a synchronous process, whereas obtaining a Device in WebGL is asynchronous:
// create a context in WebGL
const gl = $canvas.getContext('webgl');

// obtaining a device in WebGPU
const adapter = await navigator.gpu.requestAdapter();
const device = await adapter.requestDevice();
Therefore, when using the hardware abstraction layer we mentioned in the previous section, an asynchronous approach must also be used. This represents a breaking change for all rendering engines that wish to transition from WebGL to WebGPU, such as Babylon.js: Creation of the WebGPU engine is asynchronous:
import {
    WebGLDeviceContribution,
    WebGPUDeviceContribution,
} from '@antv/g-device-api';

// create a device in WebGL
const deviceContribution = new WebGLDeviceContribution({
    targets: ['webgl2', 'webgl1'],
});
// create a device in WebGPU
const deviceContribution = new WebGPUDeviceContribution({
    shaderCompilerPath: '/glsl_wgsl_compiler_bg.wasm',
});
// here's the asynchronous process
const swapChain = await deviceContribution.createSwapChain($canvas);
const device = swapChain.getDevice();
// create GPU objects with Device API
Since constructors in JavaScript do not support asynchronous operations, an asynchronous init method is added to the canvas to initialize it, and the rendering method is called after the initialization is complete:
const canvas = new Canvas();
await canvas.init();
canvas.render();
But I don't think this is a good approach. Firstly, the new keyword already implies initialization. Secondly, the init method seems to be callable multiple times, but in reality, it is not. Inspired by the Async Constructor Pattern in JavaScript, I personally prefer the following syntax:
const canvas = await new Canvas().initialized;In fact, this design pattern is also used by, for example, the Animation: ready property of the Web Animations API:
animation.ready.then(() => {});Implementation
In the implementation, we use a private variable to hold the Promise, and the getter also ensures that it is read-only:
export class Canvas {
    #instancePromise: Promise<this>;
    get initialized() {
        return this.#instancePromise.then(() => this);
    }
}
Use an Immediately Invoked Async Function Expression (IIAFE) within the constructor to perform the initialization:
constructor() {
  this.#instancePromise = (async () => {
    // Omit the specific implementation...
    return this;
  })();
}
Let's continue to optimize the current design.
Plugin-based architecture
We could, of course, place the code that calls the hardware abstraction layer within the Canvas constructor and destroy it all together in the destroy method. However, as we add more tasks during the initialization, rendering, and destruction phases, the logic of the Canvas will continue to expand. It is difficult to think through all the functionalities that need to be supported at the very beginning, hence we want the canvas to be extensible.
destroy() {
  this.device.destroy();
  this.eventManager.destroy();
  // Omit other tasks...
}
A plugin-based architecture is a common design pattern that can be seen in webpack, VS Code, and even Chrome. It has the following characteristics:
- Modularity. Each plugin is responsible for an independent part, with reduced coupling between them, making maintenance easier.
- Extensibility. Plugins can be dynamically loaded and unloaded at runtime without affecting the structure of the core module, achieving dynamic expansion capabilities of the application.
This architecture typically consists of the following parts:
- The main application. It provides the functionality to register plugins, calls plugins to execute at the appropriate stage, and provides the context needed for plugin execution.
- The plugin interface. It serves as a bridge between the main application and the plugins.
- The plugin collection. A set of independently executable modules, each plugin adheres to the principle of separation of duties, containing only the minimum required functionality.
How does the main application invoke plugin execution? Let's take a look at the approach of webpack first:
- In the main application, a series of hooks are defined. These hooks can be synchronous or asynchronous, and can be serial or parallel. If they are synchronous and serial, they are similar to the common event listeners we are familiar with. In the example below,
runis a synchronous serial hook. - Each plugin listens to the lifecycle events it cares about when it registers. In the example below,
applywill be called during registration. - The main application triggers the hooks."
class ConsoleLogOnBuildWebpackPlugin {
    apply(compiler) {
        compiler.hooks.run.tap(pluginName, (compilation) => {
            console.log('webpack starting...');
        });
    }
}
webpack implements the tapable toolkit to provide these capabilities, and also uses new Function to improve performance in mass-call scenarios, as discussed in Is the new Function performance really good? But we can simply implement it along the same lines, e.g., the hooks for synchronized serial execution use an array of callbacks, and there's no black magic:
export class SyncHook<T> {
    #callbacks: ((...args: AsArray<T>) => void)[] = [];

    tap(fn: (...args: AsArray<T>) => void) {
        this.#callbacks.push(fn);
    }

    call(...argsArr: AsArray<T>): void {
        this.#callbacks.forEach(function (callback) {
            /* eslint-disable-next-line prefer-spread */
            callback.apply(void 0, argsArr);
        });
    }
}
We define the following hooks, with names that visually reflect which phase of the main application they will be called in:
export interface Hooks {
    init: SyncHook<[]>;
    initAsync: AsyncParallelHook<[]>;
    destroy: SyncHook<[]>;
    resize: SyncHook<[number, number]>; // When height or width changed.
    beginFrame: SyncHook<[]>;
    endFrame: SyncHook<[]>;
}
The plugin context containing these hooks is passed in during the plugin registration phase, and we will continue to extend the plugin context subsequently:
export interface PluginContext {
    hooks: Hooks;
    canvas: HTMLCanvasElement;
}
export interface Plugin {
    apply: (context: PluginContext) => void;
}
Calling the apply method on canvas initialization and passing in the context completes the registration of the plugin and triggers the initialization of both synchronous and asynchronous hooks, and the rendering plugin we implement in the next section completes the asynchronous initialization:
import { Renderer } from './plugins';

this.#instancePromise = (async () => {
  const { hooks } = this.#pluginContext;
  [new Renderer()].forEach((plugin) => {
    plugin.apply(this.#pluginContext);
  });
  hooks.init.call();
  await hooks.initAsync.promise();
  return this;
})();
Now we have all the knowledge needed to implement the first plugin.
Renderer Plugin
We want to support WebGL and WebGPU, so we support configuration via the renderer parameter in the canvas constructor, which is subsequently passed into the plugin context:
constructor(config: {
  canvas: HTMLCanvasElement;
  renderer?: 'webgl' | 'webgpu';
}) {}

this.#pluginContext = {
  canvas,
  renderer,
};
Next we describe how to use the hardware abstraction layer in the rendering plugin.
SwapChain
In OpenGL / WebGL Default Framebuffer is different from the usual Framebuffer Object (FBO), which is created automatically when initializing the context. If you don't specify an FBO when calling the draw command, OpenGL will automatically write the rendering result into the Default Framebuffer, where the Color Buffer will eventually be displayed on the screen.
This is not the case in Vulkan, instead we have SwapChain, the following image from Canvas Context and Swap Chain shows how it works, the GPU writes the rendered result to the backbuffer, the frontbuffer is used for displaying it to the screen, and the two can be swapped.
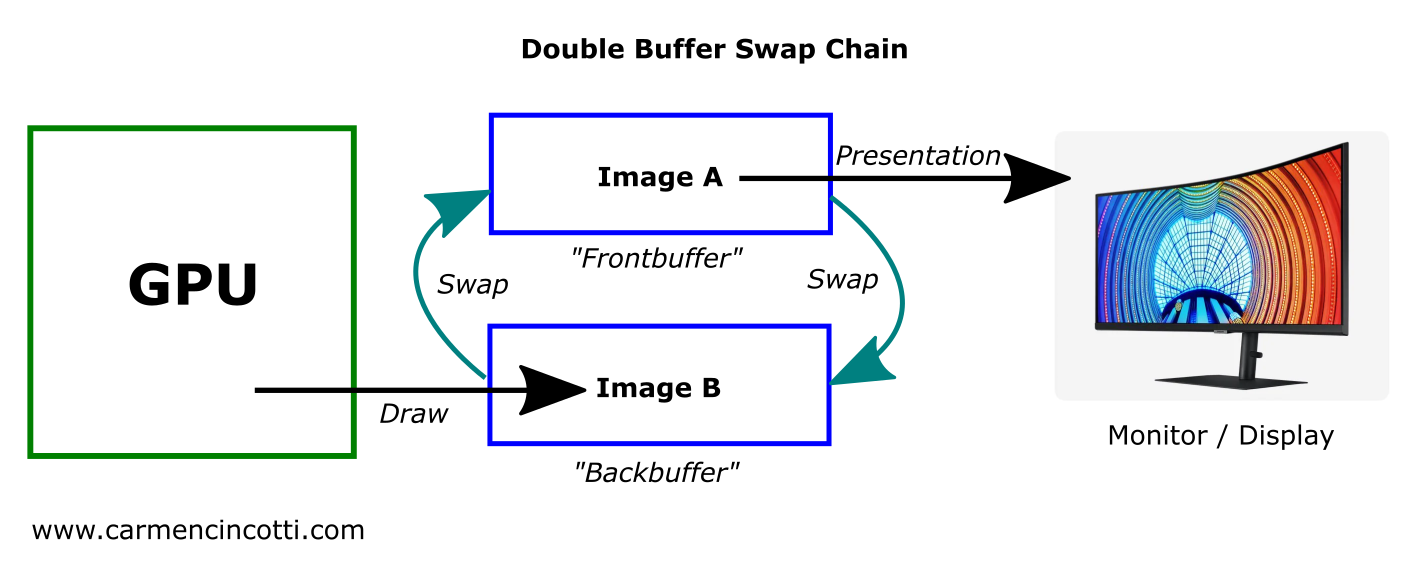
Without this double-buffering mechanism, there is a good chance that the GPU will write the rendered results at the same time as the screen is refreshing, which can cause tearing. Therefore, it is also necessary to use vertical synchronization to force the display not to allow updates, and the following figure from Canvas Context and Swap Chain shows the timing of this process.

In WebGPUs the user does not usually have direct access to the SwapChain, which is integrated into GPUCanvasContext. The wgpu, which also follows the WebGPU design, combines SwapChain into Surface, which is also not directly accessible to the user. However, our hardware abstraction layer still uses this concept for encapsulation. This allows the SwapChain and Device to be created during plugin initialization based on the renderer parameter:
import {
  WebGLDeviceContribution,
  WebGPUDeviceContribution,
} from '@antv/g-device-api';
import type { SwapChain, DeviceContribution, Device } from '@antv/g-device-api';

export class Renderer implements Plugin {
  apply(context: PluginContext) {
    const { hooks, canvas, renderer } = context;

    hooks.initAsync.tapPromise(async () => {
      let deviceContribution: DeviceContribution;
      if (renderer === 'webgl') {
        deviceContribution = new WebGLDeviceContribution();
      } else {
        deviceContribution = new WebGPUDeviceContribution();
      }
      const { width, height } = canvas;
      const swapChain = await deviceContribution.createSwapChain(canvas);
      swapChain.configureSwapChain(width, height);

      this.#swapChain = swapChain;
      this.#device = swapChain.getDevice();
    });
  }
}
devicePixelRatio
The devicePixelRatio describes how many actual screen pixels should be used to draw a single CSS pixel. Typically we would set <canvas> with the following code:
const $canvas = document.getElementById('canvas');
$canvas.style.width = `${width}px`; // CSS Pixels
$canvas.style.height = `${height}px`;

const scale = window.devicePixelRatio;
$canvas.width = Math.floor(width * scale); // Screen Pixels
$canvas.height = Math.floor(height * scale);
We use CSS pixels when describing the canvas width and height, the graphic size, and the actual pixels on the screen when creating the SwapChain. The width and height passed in at resize also use CSS pixels, so they need to be converted:
hooks.resize.tap((width, height) => {
  this.#swapChain.configureSwapChain(
    width * devicePixelRatio,
    height * devicePixelRatio,
  );
});
So how do we get devicePixelRatio? Of course we can use window.devicePixelRatio to get it, which is fine in most cases. But what if there is no window object in the running environment? For example:
- Node.js server-side rendering. For example, using headless-gl
- Rendering in a WebWorker, using OffscreenCanvas.
- Non-standard browser environments such as applets
So it's better to support passing in the canvas when it's created and trying to get it from globalThis when it's not. We modify the constructor parameters of the Canvas as follows:
export interface CanvasConfig {
  devicePixelRatio?: number;
}

const { devicePixelRatio } = config;
const globalThis = getGlobalThis();
this.#pluginContext = {
  devicePixelRatio: devicePixelRatio ?? globalThis.devicePixelRatio,
};
Other hooks are implemented as follows:
hooks.destroy.tap(() => {
    this.#device.destroy();
});

hooks.beginFrame.tap(() => {
    this.#device.beginFrame();
});

hooks.endFrame.tap(() => {
    this.#device.endFrame();
});
Finally, add the plugin to the list of plugins in the canvas:
[new Renderer(), ...plugins].forEach((plugin) => {
  plugin.apply(this.#pluginContext);
});
Demo
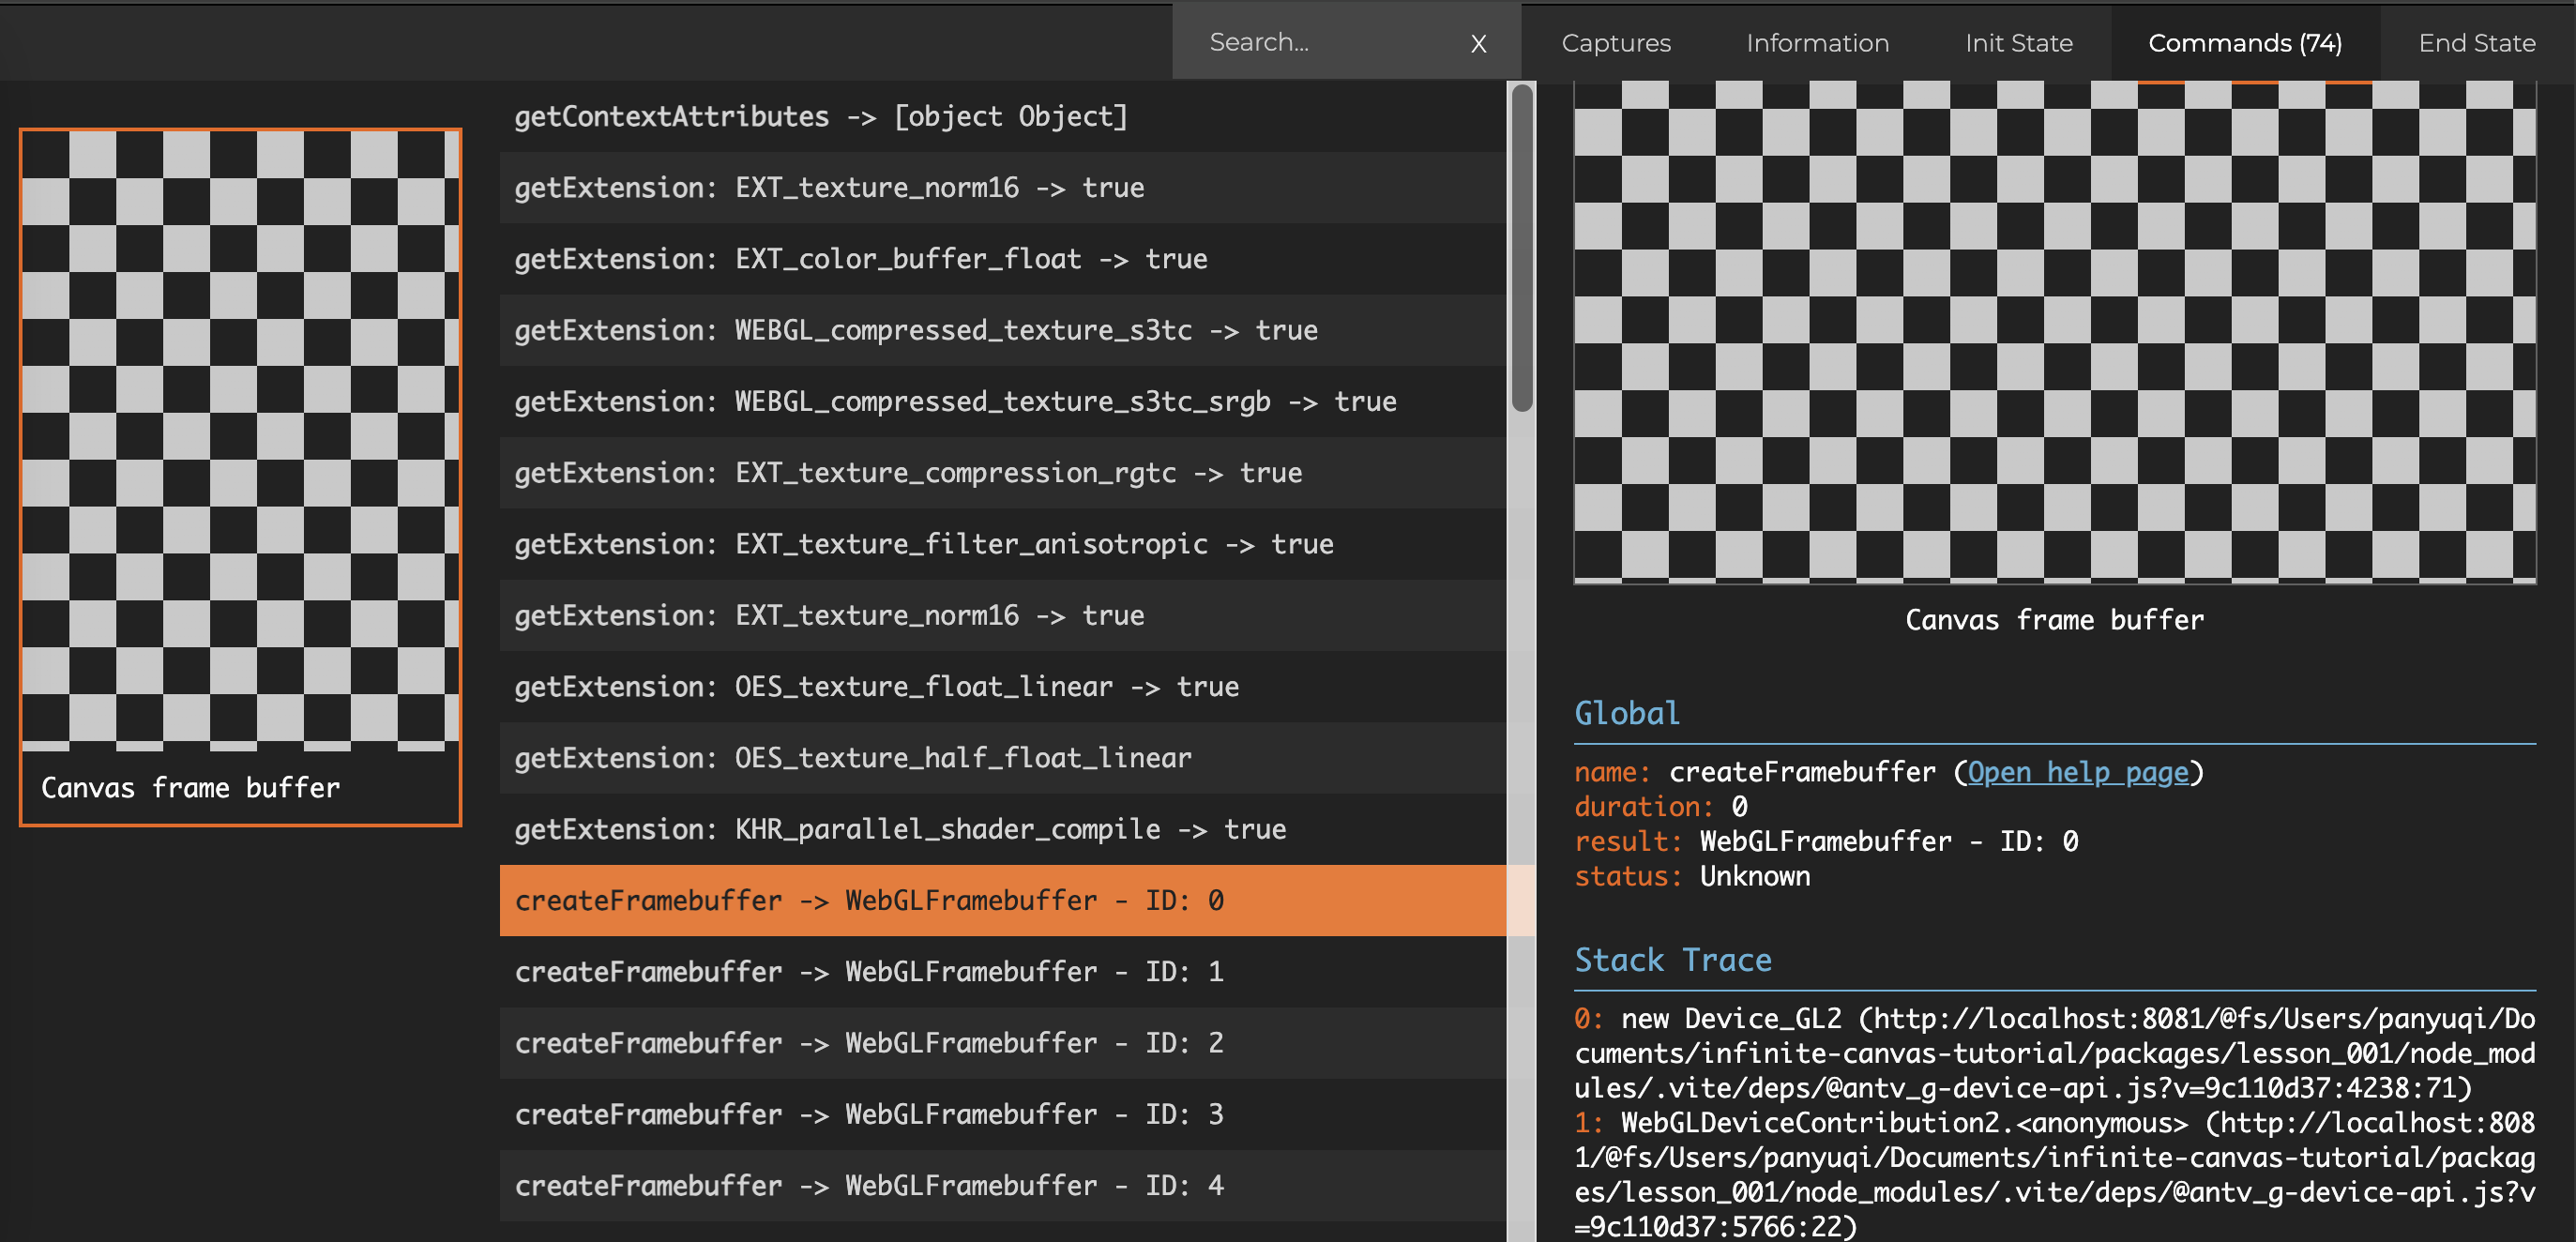
Since we haven't drawn any graphics yet and the canvas is blank, how do we know what the underlying WebGL / WebGPU commands are calling? Debugging on the web side can be done using the Chrome plugins: Spector.js and WebGPU Inspector.
The image below shows the first frame command captured using Spector.js, and you can see that we have created a series of GPU objects such as FrameBuffer, Texture, etc. The following image shows the first frame command captured using Spector.js:
After switching to WebGPU rendering:
const canvas = await new Canvas({
canvas: $canvas,
renderer: 'webgpu',
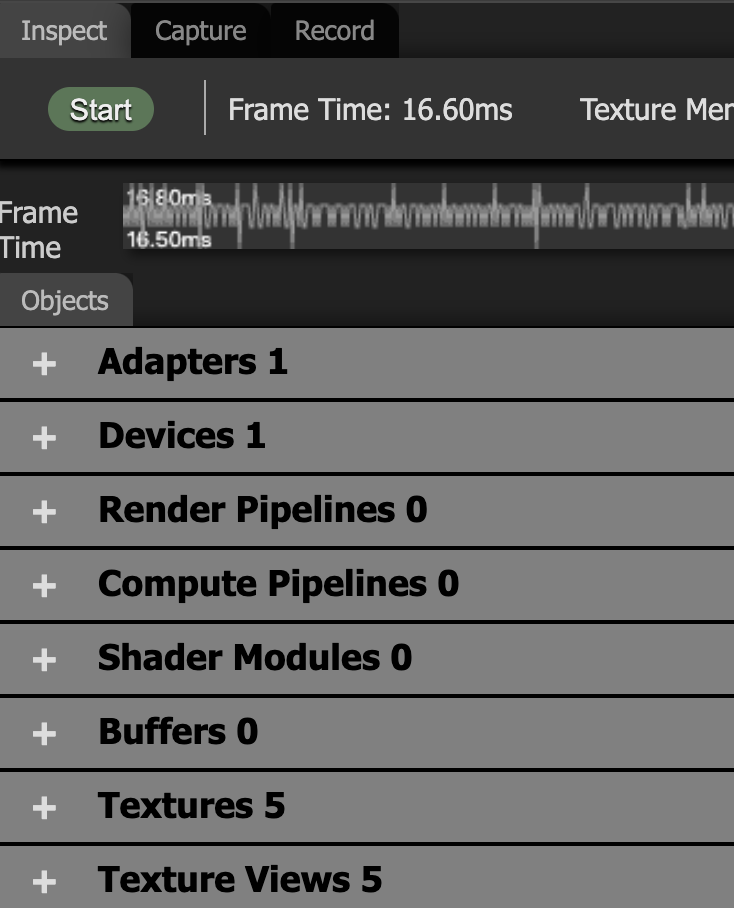
}).initialized;Open WebGPU Inspector to see the current GPU objects we've created and the commands called for each frame:
Extended reading
If you have no basic knowledge of WebGL at all, you can try to learn it first:
More on the plug-in design pattern: