Lesson 6 - Event system
In this lesson, you will learn the following:
- Implement an event system compatible with DOM Event API
- How to pick a circle
- Implement a drag-and-drop plugin based on our event system
- Support for pinch zoom gestures
$button = call(() => {
    const $button = document.createElement('button');
    $button.textContent = 'FlyTo origin';
    return $button;
});canvas = call(() => {
const { Canvas } = Lesson6;
return Utils.createCanvas(Canvas, 400, 400);
});(async () => {
const { Canvas, Circle, Group } = Lesson6;
const solarSystem = new Group();
const earthOrbit = new Group();
const moonOrbit = new Group();
const sun = new Circle({
cx: 0,
cy: 0,
r: 100,
fill: 'red',
cursor: 'pointer',
});
const earth = new Circle({
cx: 0,
cy: 0,
r: 50,
fill: 'blue',
});
const moon = new Circle({
cx: 0,
cy: 0,
r: 25,
fill: 'yellow',
});
solarSystem.appendChild(sun);
solarSystem.appendChild(earthOrbit);
earthOrbit.appendChild(earth);
earthOrbit.appendChild(moonOrbit);
moonOrbit.appendChild(moon);
solarSystem.position.x = 200;
solarSystem.position.y = 200;
earthOrbit.position.x = 100;
moonOrbit.position.x = 100;
canvas.appendChild(solarSystem);
sun.addEventListener('pointerenter', () => {
    sun.fill = 'green';
});
sun.addEventListener('pointerleave', () => {
    sun.fill = 'red';
});
let id;
const animate = () => {
solarSystem.rotation += 0.01;
earthOrbit.rotation += 0.02;
canvas.render();
id = requestAnimationFrame(animate);
};
animate();
unsubscribe(() => {
cancelAnimationFrame(id);
canvas.destroy();
});
const landmark = canvas.camera.createLandmark({
x: 0,
y: 0,
zoom: 1,
rotation: 0,
});
$button.onclick = () => {
canvas.camera.gotoLandmark(landmark, {
duration: 1000,
easing: 'ease',
});
};
return canvas.getDOM();
})();Currently, the interactions we support are at the canvas level. However, we definitely need to support editing features for individual shapes in the future. For instance, when using a mouse to select shapes, how do we know which shape has been selected after detecting a click event on the canvas? We aim to change the color of a red circle when the mouse enters or leaves it, as demonstrated by the following code:
sun.addEventListener('pointerenter', () => {
sun.fill = 'green';
});
sun.addEventListener('pointerleave', () => {
sun.fill = 'red';
});This requires the implementation of a complete event system.
Design a event system
When designing the event system, we wish to adhere to the following principles:
- Stay as consistent as possible with the DOM Event API, not only to reduce the learning curve but also to integrate with the existing ecosystem (such as gesture libraries).
- Provide only standard events. Advanced events like drag-and-drop and gestures should be defined through extensions.
The implementation we introduce below is entirely based on the PIXI.js Events Design Documents, which PIXI.js v8 is still using. If you wish to delve deeper into the details, you are encouraged to read its source code.
PointerEvent
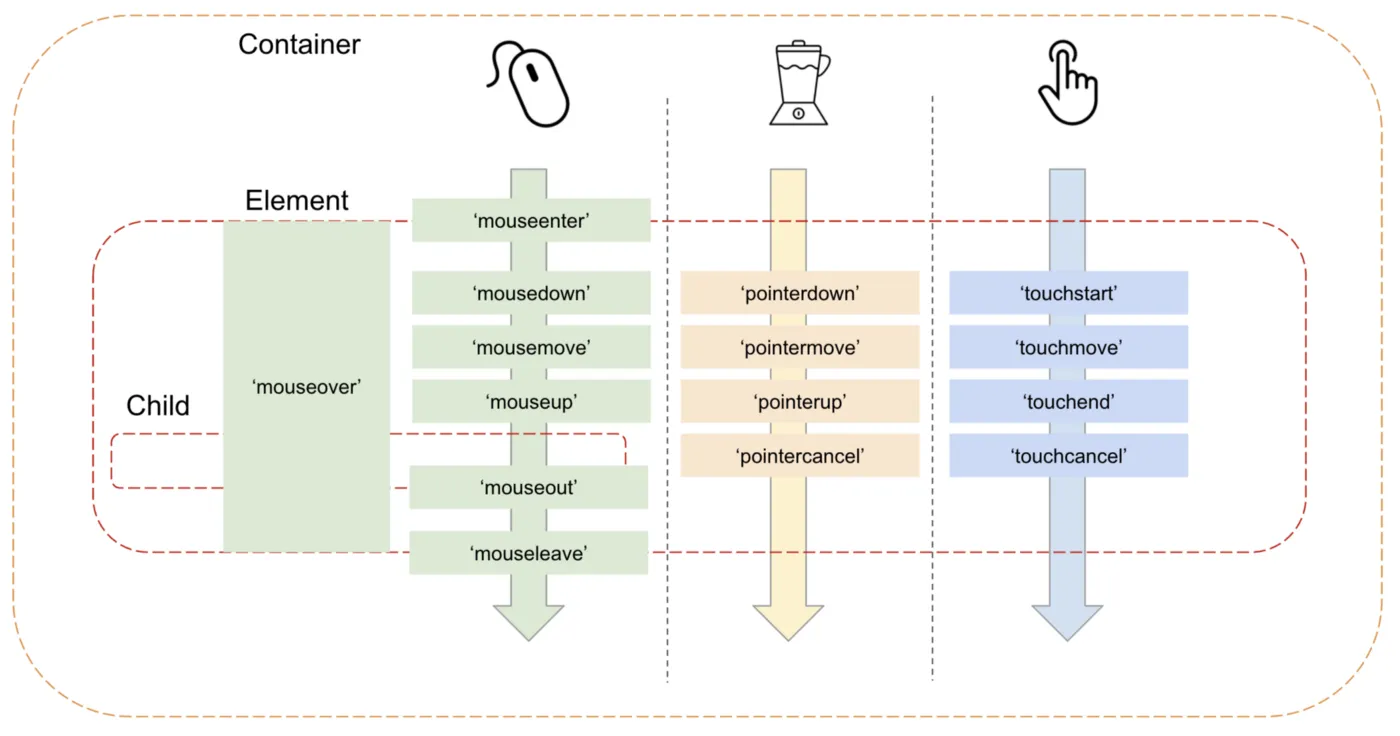
Browser support for interactive events has evolved through the following stages, for more details see: The brief history of PointerEvent
- Initially, support was provided for mouse events.
- As mobile devices gained popularity, touch events emerged and also triggered mouse events.
- Later, new input devices were introduced, such as pens, leading to a variety of event structures, which made handling them quite painful. For example, see hammer.js compatibility handling for various events.
- A new standard, PointerEvent, was proposed, aiming to cover all the aforementioned input devices.
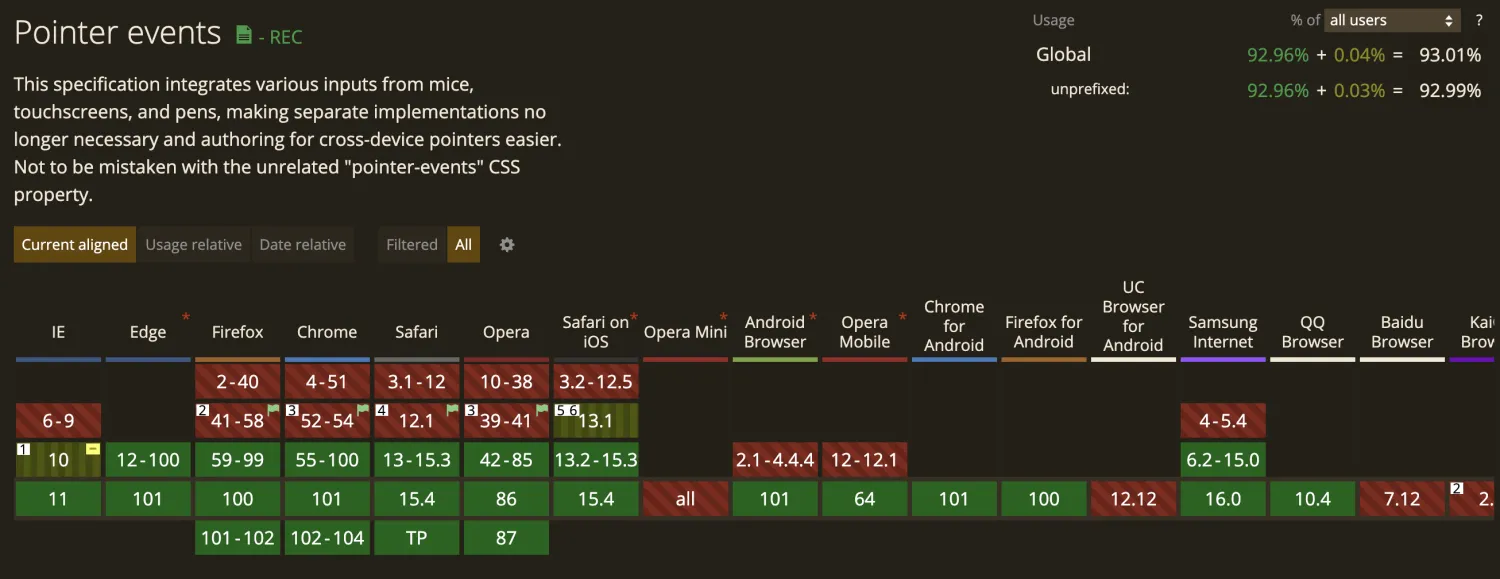
As a result, Level 2 PointerEvent is now supported by all mainstream browsers. Hammer.js has supported it since 2016 hammer.js issue.
So we want to normalize Mouse / Touch / PointerEvent. The expected usage is as follows:
circle.addEventListener('pointerdown', (e) => {
    e.target; // circle
    e.preventDefault();
    e.stopPropagation();
});
DOMEventListener
First, we need to listen for a series of interactive events on the canvas, still achieved through a plugin implementation:
export class DOMEventListener implements Plugin {}To detect whether current environment supports Pointer and Touch event:
const supportsPointerEvents = !!globalThis.PointerEvent;
const supportsTouchEvents = 'ontouchstart' in globalThis;
Once the current environment supports PointerEvent, we can start listening. It is important to note that not all events can be listened to on the HTMLCanvasElement. For instance, the listener for the pointermove event must be bound to the window or document. Otherwise, if an event is triggered outside of the canvas DOM element, it would not be detected.
const addPointerEventListener = ($el: HTMLCanvasElement) => {
    globalThis.document.addEventListener('pointermove', onPointerMove, true);
    $el.addEventListener('pointerdown', onPointerDown, true);
    $el.addEventListener('pointerleave', onPointerOut, true);
    $el.addEventListener('pointerover', onPointerOver, true);
    globalThis.addEventListener('pointerup', onPointerUp, true);
    globalThis.addEventListener('pointercancel', onPointerCancel, true);
};
If PointerEvent is not supported, then switch to listening to MouseEvent, but it will call processing functions such as onPointerDown, triggering the corresponding hook functions internally:
const addMouseEventListener = ($el: HTMLCanvasElement) => {
    globalThis.document.addEventListener('mousemove', onPointerMove, true);
    $el.addEventListener('mousedown', onPointerDown, true);
    $el.addEventListener('mouseout', onPointerOut, true);
    $el.addEventListener('mouseover', onPointerOver, true);
    globalThis.addEventListener('mouseup', onPointerUp, true);
};
const onPointerMove = (ev: InteractivePointerEvent) => {
    hooks.pointerMove.call(ev);
};
const onPointerUp = (ev: InteractivePointerEvent) => {
    hooks.pointerUp.call(ev);
};
We add more hooks to the canvas, listening for plugins to trigger them, and the subsequent event system processing plugins will respond to them:
export interface Hooks {
    pointerDown: SyncHook<[InteractivePointerEvent]>;
    pointerUp: SyncHook<[InteractivePointerEvent]>;
    pointerMove: SyncHook<[InteractivePointerEvent]>;
    pointerOut: SyncHook<[InteractivePointerEvent]>;
    pointerOver: SyncHook<[InteractivePointerEvent]>;
    pointerWheel: SyncHook<[InteractivePointerEvent]>;
    pointerCancel: SyncHook<[InteractivePointerEvent]>;
}
Add listeners to shape
Our base shape class should extend EventEmitter which provides on once off methods:
import EventEmitter from 'eventemitter3';
export abstract class Shape
    extends EventEmitter
    implements FederatedEventTarget {}
Taking addEventListener as an example, we need to implement it according to the DOM API standard using existing methods. For instance, for event listeners that are intended to be triggered only once, specify it at registration time using the once parameter:
export abstract class Shape {
  addEventListener(
    type: string,
    listener: EventListenerOrEventListenerObject,
    options?: boolean | AddEventListenerOptions,
  ) {
    const once = isObject(options) && options.once;
    const listenerFn = isFunction(listener) ? listener : listener.handleEvent;

    if (once) {
      this.once(type, listenerFn, context);
    } else {
      this.on(type, listenerFn, context);
    }
  }
}
Due to space limitations, other methods will not be elaborated here. Detailed implementations can be referenced in the PIXI.js source code:
removeEventListenerfor removing event listenersremoveAllListenersfor removing all event listenersdispatchEventfor dispatching custom events
With this, we can use the following API to listen for events, and next, we'll need to implement the event object e passed to the listener:
circle.addEventListener('pointerenter', (e) => {
    circle.fill = 'green';
});
Event object
In order to fully comply with the DOM Event API, PIXI.js uses FederatedEvent to reflect its universality, allowing it to implement the UIEvent interface. Some methods can directly invoke native events, for example, preventDefault.
export class FederatedEvent<N extends UIEvent | PixiTouch = UIEvent | PixiTouch>
    implements UIEvent
{
    preventDefault(): void {
        if (this.nativeEvent instanceof Event && this.nativeEvent.cancelable) {
            this.nativeEvent.preventDefault();
        }

        this.defaultPrevented = true;
    }
}
So how does one convert a native event object into FederatedEvent? PIXI.js first formats them into PointerEvent. Especially for multi-touch points in TouchEvent, each Touch object in changedTouches is formatted into a separate PointerEvent.
function normalizeToPointerEvent(
    event: InteractivePointerEvent,
): PointerEvent[] {
    if (supportsTouchEvents && event instanceof TouchEvent) {
        for (let i = 0; i < event.changedTouches.length; i++) {
            const touch = event.changedTouches[i] as PixiTouch;
        }
    }
}
Next we need to convert PointerEvent to FederatedPointerEvent.
function bootstrapEvent(
    event: FederatedPointerEvent,
    nativeEvent: PointerEvent,
): FederatedPointerEvent {}
Most of the attributes can be copied directly from the native event, but there are two types of properties that need special handling:
- The position of the event within the canvas coordinate system.
- target The target object of the event dispatch, namely, which graphic object on the canvas the event occurs on.
Let's first look at the first type of property.
Coordinates
When we talk about "position," it is always relative to a certain coordinate system. Client, Screen, and Page are coordinate systems natively supported by the browser. We have added two new coordinate systems: canvas and viewport.
The Canvas coordinate system can be likened to the browser's Screen coordinate system, also known as the world coordinate system, where the positions we specify when creating graphics are all relative to this coordinate system. It uses the top-left corner of the canvas DOM element as the origin, with the X-axis pointing to the right of the screen and the Y-axis pointing to the bottom of the screen. It is also called the "world coordinate system," and when it comes to rotation, we set the rotation direction to be clockwise along the positive direction of the coordinate axis.
The Viewport coordinate system can be likened to the browser's Client coordinate system. The camera determines the angle from which we observe the world. If the camera has not moved, the Viewport coordinate system and the Canvas coordinate system will completely coincide. Therefore, within our visible range, the top-left corner coordinates of the viewport are the same as the origin of the Canvas coordinate system, both are [0, 0]. But if the camera has moved, rotated, or zoomed, the viewport will change accordingly, and at this time, the top-left corner [0, 0] in the viewport corresponds to a different position in the Canvas coordinate system than [0, 0].
We provide methods for their conversion and incorporate them into the context of the plugin:
interface PluginContext {
    api: {
        client2Viewport({ x, y }: IPointData): IPointData;
        viewport2Client({ x, y }: IPointData): IPointData;
        viewport2Canvas({ x, y }: IPointData): IPointData;
        canvas2Viewport({ x, y }: IPointData): IPointData;
    };
}
Before proceeding with subsequent event processing, we convert the coordinates from the native event to the viewport coordinate system, and then to the world coordinate system. This is done within the Event plugin:
export class Event implements Plugin {
    private bootstrapEvent(
        event: FederatedPointerEvent,
        nativeEvent: PointerEvent,
    ): FederatedPointerEvent {
        const { x, y } = this.getViewportXY(nativeEvent);
        event.client.x = x;
        event.client.y = y;
        const { x: canvasX, y: canvasY } = this.viewport2Canvas(event.client);
        event.screen.x = canvasX;
        event.screen.y = canvasY;
    }
}
With this, the coordinates on the event object are established. Temporarily skipping the issue of "which graphic object the event occurs on," let’s first take a look at how to implement a complete event propagation process.
Event propagation process
Developers familiar with the DOM event flow will certainly recognize the following concepts:
- The
targetproperty of the event object points to the target element, which in the context of the DOM API is naturally a DOM element, while in our canvas, it is a specific graphic object. We will introduce this in the next section. - The event flow includes both capturing and bubbling phases, and certain methods on the event object allow intervention in these phases.
- One can add one or more listeners for a specific event, and they are triggered in the order they were registered.
Bubbling and capturing demonstrate the three stages of event propagation: during the capturing phase, listeners are triggered in a top-down manner, reaching the target node and then bubbling upward. Within the listener, the eventPhase can be used to obtain the current phase.

PIXI.js implements these in EventBoundary.
propagate(e: FederatedEvent, type?: string): void {
  const composedPath = e.composedPath();

  // Capturing phase
  e.eventPhase = e.CAPTURING_PHASE;
  for (let i = 0, j = composedPath.length - 1; i < j; i++) {
    e.currentTarget = composedPath[i];
    this.notifyTarget(e, type);
    if (e.propagationStopped || e.propagationImmediatelyStopped) return;
  }

  // At target phase
  e.eventPhase = e.AT_TARGET;
  e.currentTarget = e.target;
  this.notifyTarget(e, type);
  if (e.propagationStopped || e.propagationImmediatelyStopped) return;

  // Bubbling phase
  e.eventPhase = e.BUBBLING_PHASE;
  for (let i = composedPath.length - 2; i >= 0; i--) {
    e.currentTarget = composedPath[i];
    this.notifyTarget(e, type);
    if (e.propagationStopped || e.propagationImmediatelyStopped) return;
  }
}
Picking
Determining which graphic object an event occurs in is accomplished through the picking function. The DOM API offers the elementsFromPoint method that returns a list of elements corresponding to a specified point under the viewport coordinate system. However, since we are not using an SVG renderer, this method is not applicable to us. We have the following two choices:
- Geometric method. For example, determining whether a point is within a circle.
- Method based on GPU color coding. This will be detailed later.
From the perspective of the picking criteria, aspects such as the visibility of the graphic, stroke, and fill can all be considered, similar to how CSS provides the pointer-events property. We also add a pointerEvents property to the graphic base class:
export abstract class Shape {
  pointerEvents: PointerEvents = 'auto';
}

type PointerEvents =
  | 'none'
  | 'auto'
  | 'stroke'
  | 'fill'
  | 'painted'
  | 'visible'
  | 'visiblestroke'
  | 'visiblefill'
  | 'visiblepainted'
  | 'all'
  | 'non-transparent-pixel';
Picking plugin
Create a picking plugin that traverses the scene graph starting from the root node, sequentially determining whether the point under the world coordinate system is within a graphic object. It's important to note that upon a hit, the item needs to be added to the front of the list, because elements rendered later appear on a higher layer due to their render order. Of course, later on, we will introduce a zIndex attribute to adjust the rendering order.
export class Picker implements Plugin {
  private pick(result: PickingResult, root: Group) {
    const {
      position: { x, y },
    } = result;

    const picked: Shape[] = [];
    traverse(root, (shape: Shape) => {
      if (this.hitTest(shape, x, y)) {
        picked.unshift(shape);
      }
    });

    result.picked = picked;
    return result;
  }
}
During detection, the first step is to transform the target point from the world coordinate system to the model coordinate system, which is achieved by using the inverse of the model transformation matrix. Transforming to the model coordinate system simplifies the subsequent geometric determination methods to the greatest extent:
export class Picker implements Plugin {
    private hitTest(shape: Shape, wx: number, wy: number): boolean {
        // skip testing
        if (shape.pointerEvents === 'none') {
            return false;
        }

        shape.worldTransform.applyInverse({ x: wx, y: wy }, tempLocalMapping);
        const { x, y } = tempLocalMapping;
        return shape.containsPoint(x, y);
    }
}
Now let's implement containsPoint method.
Geometric method
To determine whether a point is inside a circle, we can use the familiar Signed Distance Field (SDF) method, but this time we also take into account the strokeWidth and pointerEvents attributes:
class Circle {
    containsPoint(x: number, y: number) {
        const halfLineWidth = this.#strokeWidth / 2;
        const absDistance = vec2.length([this.#cx - x, this.#cy - y]);

        const [hasFill, hasStroke] = isFillOrStrokeAffected(
            this.pointerEvents,
            this.#fill,
            this.#stroke,
        );
        if (hasFill) {
            return absDistance <= this.#r;
        }
        if (hasStroke) {
            return (
                absDistance >= this.#r - halfLineWidth &&
                absDistance <= this.#r + halfLineWidth
            );
        }
        return false;
    }
}
It looks good, but it requires starting the traversal from the root node of the scene graph each time. If there are numerous graphic objects in the scene, the cost is significant when events are frequently triggered. In the next lesson, we will introduce related optimization methods.
hitArea
Sometimes, we might want to change the interactive area of a graphic, such as slightly enlarging it for easier clicking when the graphic is small, or adding interactive areas to a Group that does not have a tangible entity.
export interface FederatedEventTarget {
    hitArea?: Rectangle;
}
We can modify the previously created CameraControl plugin by first adding an infinitely large interactive area to the root node. Here, we cannot directly set the rectangle's top-left coordinate to [-Infinity, -Infinity] because doing so would result in the width and height calculations becoming NaN, which would prevent subsequent detections:
root.hitArea = new Rectangle(
    -Number.MAX_VALUE,
    -Number.MAX_VALUE,
    Infinity,
    Infinity,
);
We listen to FederatedPointerEvent instead of native MouseEvent.
canvas.addEventListener('mousedown', (e: MouseEvent) => {});
root.addEventListener('pointerdown', (e: FederatedPointerEvent) => {});
Picking with API
The picking functionality can not only be achieved through interactive events but can also be exposed as an API for explicit calls, similar to elementsFromPoint. This will be utilized when we implement the drag-and-drop plugin in the next section.
class Canvas {
    elementsFromPoint(x: number, y: number): Shape[] {}
    elementFromPoint(x: number, y: number): Shape {}
}
Dragndrop plugin
We can implement a dragndrop plugin according to Drag'n'Drop with mouse events with PointerEvent.
export class Dragndrop implements Plugin {}To determine the conditions for initiating a "drag start," the following configuration options are provided, based on dragging distance and time, respectively. Only when these conditions are fully met will a series of drag-and-drop events like dragstart be triggered.
dragstartDistanceThreshold: This configuration item is used to set the detection threshold for the drag distance, in pixels. Only distances greater than this value will be considered a valid start. The default value is0.dragstartTimeThreshold: This configuration item is used to set the detection threshold for the drag time, in milliseconds. Only times greater than this threshold will be considered a valid start. The default value is0.
In the HTML Drag and Drop API implementation, either a click event or a drag event is triggered, but never both for the same action. This behavior is evident from the example provided.
Retaining this setting in your implementation, where a click event does not fire after a dragend event, aligns with how users typically understand and interact with draggable elements. This approach ensures a consistent and predictable behavior that enhances the user experience by clearly distinguishing between dragging and clicking actions.
if (!e.detail.preventClick) {
    this.dispatchEvent(clickEvent, 'click');
}
Modify CameraControl plugin
To implement the CameraControl plugin with drag functionality, you'll begin by making the root node draggable and then switch from listening to pointerdown and similar events to listening to drag-related events.
root.draggable = true;
root.addEventListener('dragstart', (e: FederatedPointerEvent) => {});
root.addEventListener('drag', (e: FederatedPointerEvent) => {});
root.addEventListener('dragend', (e: FederatedPointerEvent) => {});
Currently, our camera does not support gesture operations. In addition to zooming the canvas with the mouse wheel, we want to add the common pinch gesture for two-finger interactions, similar to pixi-viewport.
Support pinch gesture
To simulate gesture events during PC development, we can use hammer-touchemulator, which is part of the hammer.js ecosystem. By using the mouse along with the Shift key, it's possible to emulate the triggering of multiple PointerEvents. Of course, you can also use the iOS simulator in Xcode, which allows for gesture interaction testing, such as pinch-to-zoom with two fingers. Interacting with your app in the iOS and iPadOS simulator
Two-finger pinch, zoom, or rotate: Click and drag while pressing the Option key.
Save the position of each touch object when listening to pointerdown event.
this.#touches[event.pointerId] = { last: null };When listening to the pointermove event, record the distance between two touch points and compare it with the previous distance. As the two points move closer together, it corresponds to zooming out, and as they move further apart, it corresponds to zooming in.
zoomByPoint(point.x, point.y, (last / dist - 1) * PINCH_FACTOR);Here's the effect on iOS simulator.