Lesson 4 - Camera
In this lesson you will learn the following:
- What is a Camera?
- Projection transformation.
- Camera transformation.
- Camera animation. Using Landmark transition between different camera states.
We can change the content displayed on the canvas by controlling the camera. Clicking and dragging the mouse allows for panning; holding down Shift and dragging enables rotation around a specified point; using the mouse wheel allows for zooming in and out on a specified point. Pressing the button resets to the initial state with a smooth transition effect.
$button = call(() => {
    const $button = document.createElement('button');
    $button.textContent = 'FlyTo origin';
    return $button;
});(async () => {
const { Canvas, Circle, Group } = Lesson4;
const canvas = await Utils.createCanvas(Canvas, 400, 400);
const solarSystem = new Group();
const earthOrbit = new Group();
const moonOrbit = new Group();
const sun = new Circle({
cx: 0,
cy: 0,
r: 100,
fill: 'red',
});
const earth = new Circle({
cx: 0,
cy: 0,
r: 50,
fill: 'blue',
});
const moon = new Circle({
cx: 0,
cy: 0,
r: 25,
fill: 'yellow',
});
solarSystem.appendChild(sun);
solarSystem.appendChild(earthOrbit);
earthOrbit.appendChild(earth);
earthOrbit.appendChild(moonOrbit);
moonOrbit.appendChild(moon);
solarSystem.position.x = 200;
solarSystem.position.y = 200;
earthOrbit.position.x = 100;
moonOrbit.position.x = 100;
canvas.appendChild(solarSystem);
let id;
const animate = () => {
solarSystem.rotation += 0.01;
earthOrbit.rotation += 0.02;
canvas.render();
id = requestAnimationFrame(animate);
};
animate();
unsubscribe(() => {
cancelAnimationFrame(id);
canvas.destroy();
});
const landmark = canvas.camera.createLandmark({
x: 0,
y: 0,
zoom: 1,
rotation: 0,
});
$button.onclick = () => {
canvas.camera.gotoLandmark(landmark, {
duration: 1000,
easing: 'ease',
});
};
return canvas.getDOM();
})();What is a camera?
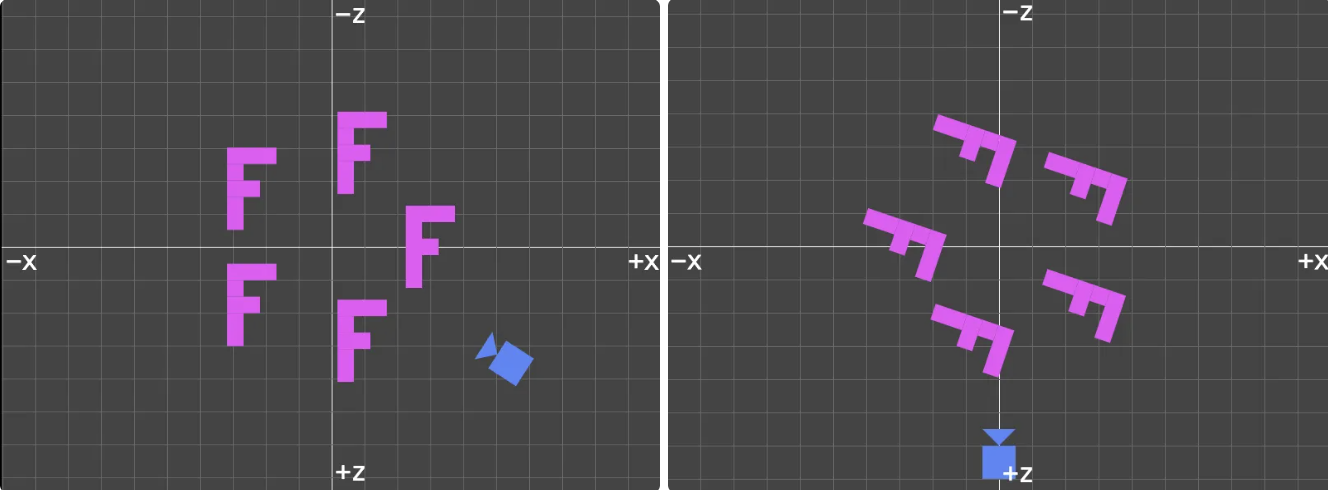
The camera describes the angle from which we view the world. The focalpoint and camera position both affect the final image. It is applicable to both 2D and 3D scenes. By controlling the camera, we can easily perform certain operations that previously required moving the entire canvas, and we can even achieve camera animations. The following diagram from WebGL 3D - Cameras shows the content of the XZ plane from a bird's-eye view. If you want to achieve the same visual effect, moving the camera (left image) as opposed to rotating all objects within the entire canvas (right image) is more intuitive and performs better in implementation. We will soon see this point:
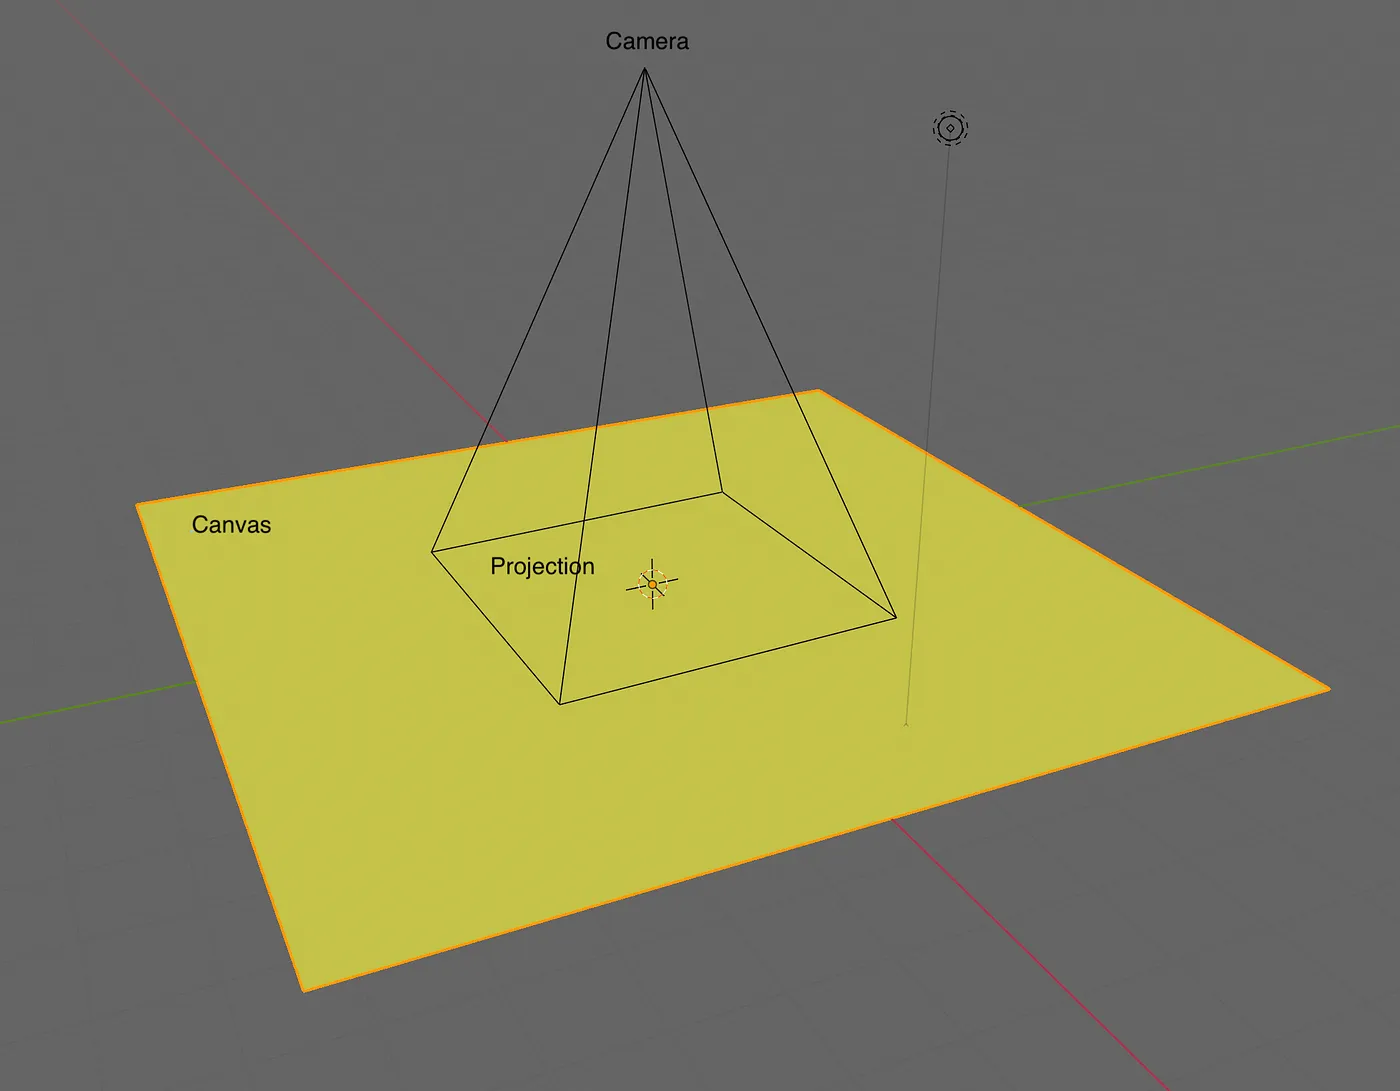
Our canvas is situated on the XY plane, and the camera observes it from outside the screen, inward. The following image is from: How to Create a Figma-like Infinite Canvas in WebGL. When we want to pan the canvas to the left, the corresponding camera movement is to pan to the right:
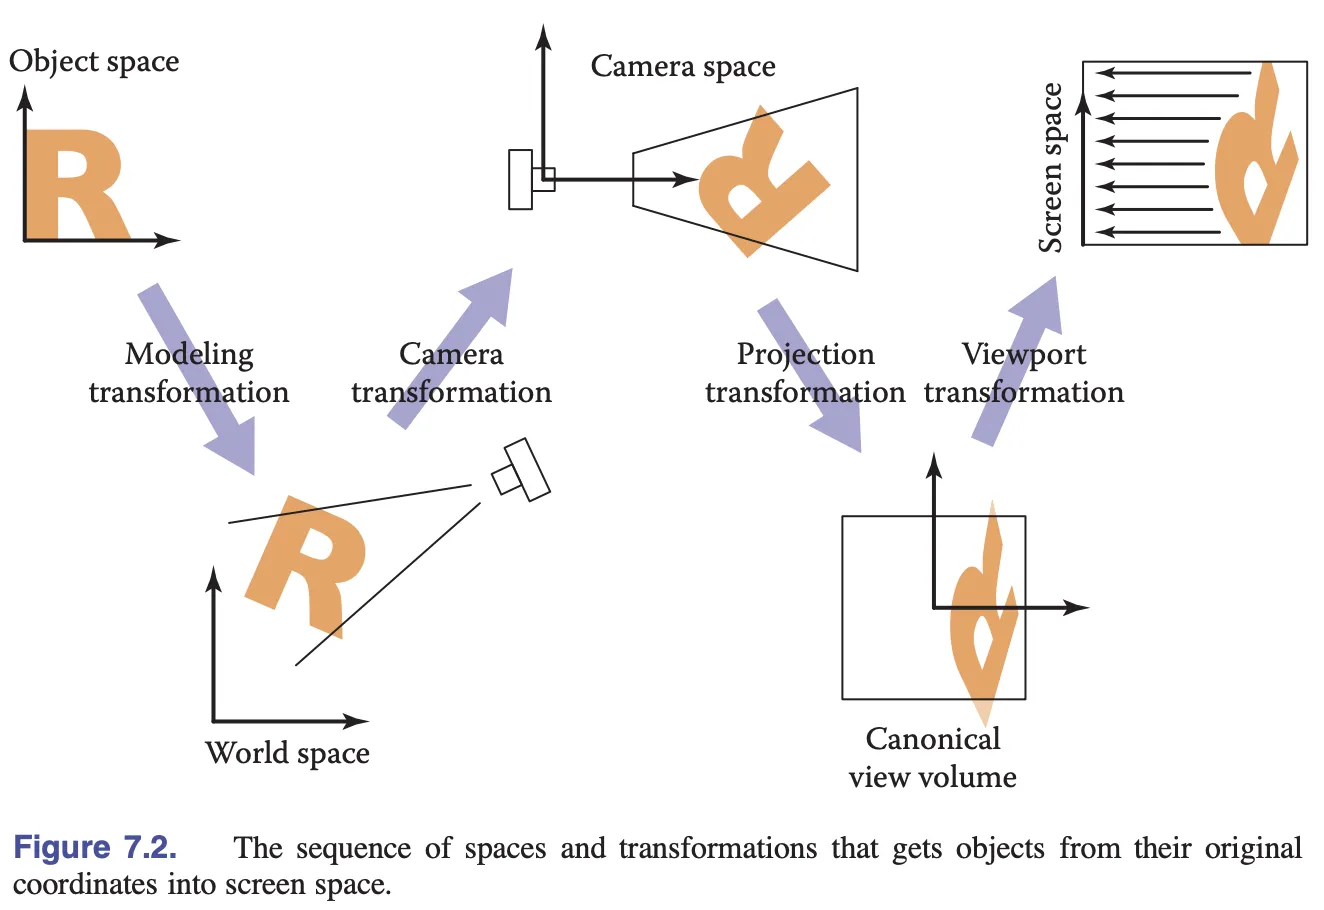
Let's review the various stages of transforming an object from model space to screen space. In the previous lesson, we introduced model transformations. In this lesson, we will discuss projection transformations and camera transformations.
Projection transformation
Let's first review the transformation from pixel space to clip space that we covered before:
// Pixel space to [0, 1] (Screen space)
vec2 zeroToOne = position / u_Resolution;

// Convert from [0, 1] to [0, 2]
vec2 zeroToTwo = zeroToOne * 2.0;

// Convert from [0, 2] to [-1, 1] (NDC/clip space)
vec2 clipSpace = zeroToTwo - 1.0;

// Flip Y axis
gl_Position = vec4(clipSpace * vec2(1, -1), 0.0, 1.0);
If we can complete it with a single projection transformation, the code would be much more streamlined. For example, we could directly multiply by the model transformation matrix on the left:
layout(std140) uniform SceneUniforms {
  mat3 u_ProjectionMatrix;
};

gl_Position = vec4((u_ProjectionMatrix
    * u_ModelMatrix
    * vec3(position, 1)).xy, 0, 1);
The 2D projection transformation is very easy to implement; you only need to provide width and height. Division by u_Resolution in the shader corresponds to / width and / height here:
[2 / width, 0, 0, 0, -2 / height, 0, -1, 1, 1];We directly use the projection method provided by gl-matrix. If interested, you can view its source code, as the implementation is exactly the same. This method also needs to be called again to recalculate when the canvas is resized.
export class Camera {
    #projectionMatrix = mat3.create();

    get projectionMatrix() {
        return this.#projectionMatrix;
    }

    projection(width: number, height: number) {
        mat3.projection(this.#projectionMatrix, width, height);
    }
}
However, we cannot pass the projectionMatrix directly because of the alignment issue we mentioned in the last lesson. We need to add padding to the mat3 before passing it into the shader:
export function paddingMat3(matrix: mat3) {
    return [
        matrix[0],
        matrix[1],
        matrix[2],
        0,
        matrix[3],
        matrix[4],
        matrix[5],
        0,
        matrix[6],
        matrix[7],
        matrix[8],
        0,
    ];
}
Finally, we create the camera in sync with the canvas initialization. Subsequently, we can access it through canvas.camera:
export class Canvas {
    #camera: Camera;
    get camera() {
        return this.#camera;
    }

    constructor() {
        const camera = new Camera(width / dpr, height / dpr);
        this.#camera = camera;
    }
}
Now let's consider the issue of camera transformations, such as translation.
Camera transformation
Camera transformations can also be represented by matrices. After completing the transformations, we can use them in the shader as follows. Compared to computing and updating the model transformation matrix u_ModelMatrix for each graphic, a global one-time update of the camera transformation matrix is more efficient:
layout(std140) uniform SceneUniforms {
  mat3 u_ProjectionMatrix;
  mat3 u_ViewMatrix;
};

gl_Position = vec4((u_ProjectionMatrix
    * u_ViewMatrix
    * u_ModelMatrix
    * vec3(position, 1)).xy, 0, 1);
The camera transformation matrix should be the inverse of the camera's transformation in the world coordinate system. As mentioned in the example at the beginning, when the camera moves to the right, it corresponds to the scene moving to the left. Here we use the invert method provided by gl-matrix to calculate the inverse matrix. At the same time, add other getters such as projectionMatrix * viewMatrix for subsequent use:
export class Camera {
  #matrix = mat3.create();
  private updateMatrix() {
    mat3.invert(this.#viewMatrix, this.#matrix);
    this.updateViewProjectionMatrix();
  }

  get viewMatrix() {
    return this.#viewMatrix;
  }

  get viewProjectionMatrix() {
    return this.#viewProjectionMatrix;
  }

  get viewProjectionMatrixInv() {
    return this.#viewProjectionMatrixInv;
  }
}
Translation
In the definition of an infinite canvas in infinitecanvas, "extensibility" is manifested through canvas-level translation:

Now, let's implement basic camera functionality. Compared to a 3D camera, it's much simpler, supporting translation x/y, rotation rotation, and scaling zoom. The reason for not using scaling as the naming is because zoom is more commonly used (for example, the OrthographicCamera.zoom in Three.js):
export class Camera {
    #zoom = 1;
    #x = 0;
    #y = 0;
    #rotation = 0;

    private updateMatrix() {
        const zoomScale = 1 / this.#zoom;
        mat3.identity(this.#matrix);
        mat3.translate(this.#matrix, this.#matrix, [this.#x, this.#y]);
        mat3.rotate(this.#matrix, this.#matrix, this.#rotation);
        mat3.scale(this.#matrix, this.#matrix, [zoomScale, zoomScale]);
        mat3.invert(this.#viewMatrix, this.#matrix);
        this.updateViewProjectionMatrix();
    }
}
When we translate the camera using camera.x += 100;, we need to recalculate the camera matrix:
export class Camera {
    set x(x: number) {
        if (this.#x !== x) {
            this.#x = x;
            this.updateMatrix();
        }
    }
}
Try it out by dragging the Slider to move the camera:
canvas = call(() => {
    const { Canvas } = Lesson4;
    return Utils.createCanvas(Canvas, 400, 400);
});positionX = Inputs.range([0, 100], { label: 'camera.x', value: 0, step: 1 });positionY = Inputs.range([0, 100], { label: 'camera.y', value: 0, step: 1 });call(() => {
const camera = canvas.camera;
camera.x = positionX;
camera.y = positionY;
});(async () => {
const { Circle, Group } = Lesson4;
canvas.getDOM().style.pointerEvents = 'none';
const solarSystem = new Group();
const earthOrbit = new Group();
const moonOrbit = new Group();
const sun = new Circle({
cx: 0,
cy: 0,
r: 100,
fill: 'red',
});
const earth = new Circle({
cx: 0,
cy: 0,
r: 50,
fill: 'blue',
});
const moon = new Circle({
cx: 0,
cy: 0,
r: 25,
fill: 'yellow',
});
solarSystem.appendChild(sun);
solarSystem.appendChild(earthOrbit);
earthOrbit.appendChild(earth);
earthOrbit.appendChild(moonOrbit);
moonOrbit.appendChild(moon);
solarSystem.position.x = 200;
solarSystem.position.y = 200;
earthOrbit.position.x = 100;
moonOrbit.position.x = 100;
canvas.appendChild(solarSystem);
let id;
const animate = () => {
solarSystem.rotation += 0.01;
earthOrbit.rotation += 0.02;
canvas.render();
id = requestAnimationFrame(animate);
};
animate();
unsubscribe(() => {
cancelAnimationFrame(id);
canvas.destroy();
});
return canvas.getDOM();
})();It looks good. It would be even more intuitive if you could interact by dragging with the mouse.
Implement a plugin
We decide to implement this feature through a plugin:
export class CameraControl implements Plugin {}

[new CameraControl(), new Renderer()].forEach((plugin) => {
  plugin.apply(this.#pluginContext);
});
Referencing How to implement zoom from mouse in 2D WebGL, we convert the coordinates contained in the mouse event object from canvas coordinates to clip space coordinates:
function getClipSpaceMousePosition(e: MouseEvent): vec2 {
    // CSS space
    const rect = canvas.getBoundingClientRect();
    const cssX = e.clientX - rect.left;
    const cssY = e.clientY - rect.top;

    // Normalize to [0, 1]
    const normalizedX = cssX / canvas.clientWidth;
    const normalizedY = cssY / canvas.clientHeight;

    // Convert to clipspace
    const clipX = normalizedX * 2 - 1;
    const clipY = normalizedY * -2 + 1;

    return [clipX, clipY];
}
Next, we listen to the mousedown event and handle the subsequent mousemove and mouseup events, which are not global.
canvas.addEventListener('mousedown', (e) => {
    e.preventDefault();
    window.addEventListener('mousemove', handleMouseMove);
    window.addEventListener('mouseup', handleMouseUp);

    // the invert matrix of vp matrix
    mat3.copy(startInvertViewProjectionMatrix, camera.viewProjectionMatrixInv);
    // camera postion in world space
    startCameraX = camera.x;
    startCameraY = camera.y;
    // convert mouse position to world space
    startPos = vec2.transformMat3(
        startPos,
        getClipSpaceMousePosition(e),
        startInvViewProjMatrix,
    );
});
We need to record the following variables:
startInvViewProjMatrix- the inverse matrix of the camera's projection matrixstartCameraX- the camera's X coordinate in world spacestartCameraY- the camera's Y coordinate in world spacestartPos- the current mouse position in world space, which is obtained by transforming the coordinates in NDC (Normalized Device Coordinates) space with the inverse of the camera's projection matrix
When the mouse is released, unbind the event listeners which will ends the drag interaction.
function handleMouseUp(e) {
    window.removeEventListener('mousemove', handleMouseMove);
    window.removeEventListener('mouseup', handleMouseUp);
}
When the mouse moves, the camera is moved as well. Similarly, it needs to be converted to world space coordinates. Then, the current mouse position is subtracted from the mouse position saved during the previous mousedown, obtaining the distance moved.
function handleMouseMove(e: MouseEvent) {
    moveCamera(e);
}

function moveCamera(e: MouseEvent) {
    const pos = vec2.transformMat3(
        vec2.create(),
        getClipSpaceMousePosition(e),
        startInvertViewProjectionMatrix,
    );

    camera.x = startCameraX + startPos[0] - pos[0];
    camera.y = startCameraY + startPos[1] - pos[1];
}
You can try to drag canvas in the example at the top of this page.
Rotation
Rotation is not an essential feature for the canvas, but a FigJam user once inquired in the forums about its support: Rotate canvas, as a slight rotation of the canvas aligns more with their usual usage habits.
We intend to facilitate canvas rotation by holding down the Shift key while dragging the mouse. In the mousedown event listener, we can determine whether to enter rotation mode by checking KeyboardEvent: shiftKey:
canvas.addEventListener('mousedown', (e) => {
  rotate = e.shiftKey;
});

function handleMouseMove(e: MouseEvent) {
  if (rotate) {
    rotateCamera(e);
  } else {
    moveCamera(e);
  }
}
In the camera rotation mode, the distance moved by the mouse will be taken as the angle of rotation. Next, we construct a transformation matrix for rotation around a specified point in the world coordinate system; this can be referenced from transform-origin. Then, this transformation is applied to the camera matrix, and finally, various parameters are extracted from the matrix:
function rotateCamera(e: MouseEvent) {
    // convert moved distance to ratation
    const delta = (e.clientX - startMousePos[0]) / 100;

    // create matrix with pivot
    const camMat = mat3.create();
    mat3.translate(camMat, camMat, [startPos[0], startPos[1]]);
    mat3.rotate(camMat, camMat, delta);
    mat3.translate(camMat, camMat, [-startPos[0], -startPos[1]]);

    // apply transformation
    camera.x = startCameraX;
    camera.y = startCameraY;
    camera.rotation = startCameraRotation;
    mat3.multiply(camMat, camMat, camera.matrix);

    // Reset camera params
    camera.x = camMat[6];
    camera.y = camMat[7];
    camera.rotation = startCameraRotation + delta;
}
You can return to the example at the top of the page and try holding down Shift and dragging the canvas.
Rotate around pivot
In an infinite canvas, aside from panning, zooming is also a very common operation, especially zooming around a specific point:

Listen to the wheel event, first recording the position of the mouse before zooming. After zooming and updating the camera matrix, calculate the difference in positions. This difference is the distance the camera needs to move:
canvas.addEventListener('wheel', (e) => {
    e.preventDefault();
    const position = getClipSpaceMousePosition(e);

    // mouse position in world space before zooming
    const [preZoomX, preZoomY] = vec2.transformMat3(
        vec2.create(),
        position,
        camera.viewProjectionMatrixInv,
    );

    // calculate zoom factor
    const newZoom = camera.zoom * Math.pow(2, e.deltaY * -0.01);
    camera.zoom = Math.max(MIN_ZOOM, Math.min(MAX_ZOOM, newZoom));

    // mouse position in world space after zooming
    const [postZoomX, postZoomY] = vec2.transformMat3(
        vec2.create(),
        position,
        camera.viewProjectionMatrixInv,
    );

    // move camera
    camera.x += preZoomX - postZoomX;
    camera.y += preZoomY - postZoomY;
});
PointerEvent
So far, we've been listening to MouseEvent. In the future, when we implement the event system, we will introduce PointerEvent. At that time, we will come back and modify the code for the event listener part of the CameraControl plugin to make it support input devices like touch screens, etc.

Now, let's move on to the next topic: how to make the movement of the camera more natural.
Camera animation
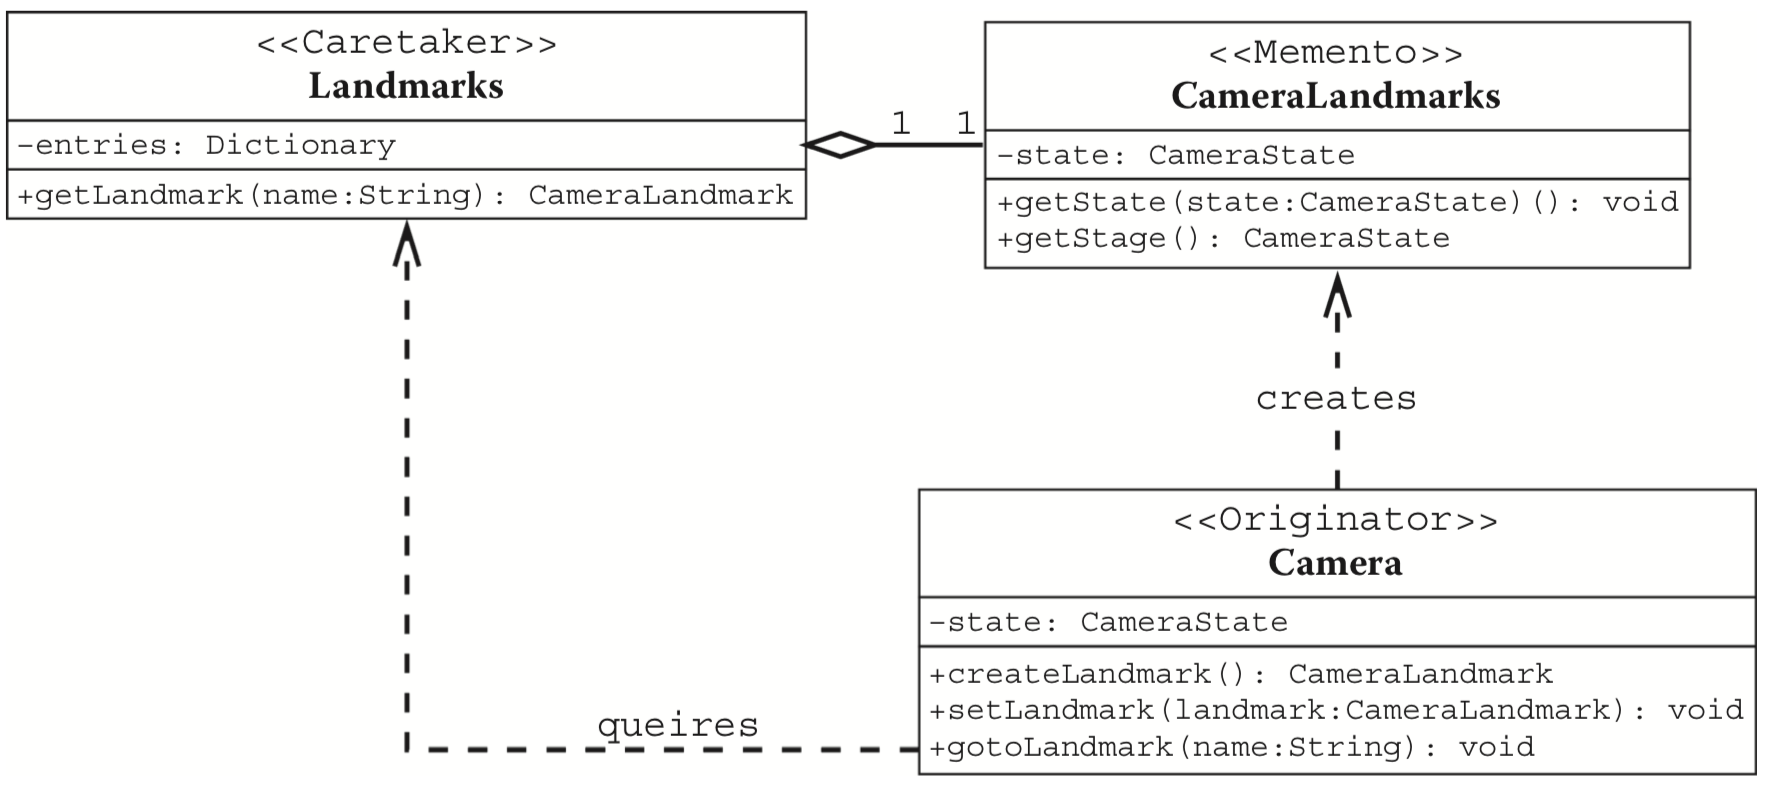
Mapbox provides flyTo - Mapbox method which can move between different locations smoothly. We will refer to WebGL Insights - 23.Designing Cameras for WebGL Applications to implement camera animations, allowing smooth transitions between any camera states.
The expected usage of the related API is as follows:
- Create a
Landmark, which can represent the current state of the camera, and can also set parameters such as position, rotation angle, and scale. - Make the camera transition from its current state to a specified
Landmark, including a smooth transition effect during the process.
const landmark = camera.createLandmark({ zoom: 2 });
camera.gotoLandmark(landmark, { duration: 300 });
Create Landmark
Landmark needs to store camera's states:
export interface Landmark {
    zoom: number;
    x: number;
    y: number;
    rotation: number;
}
Creating a Landmark is essentially just about simply storing camera parameters, which will be overwritten if the user provides them:
export class Camera {
    createLandmark(params: Partial<Landmark>): Landmark {
        return {
            zoom: this.#zoom,
            x: this.#x,
            y: this.#y,
            rotation: this.#rotation,
            ...params,
        };
    }
}
Animation effects
We use bezier-easing to implement Cubic Bézier easing functions:
import BezierEasing from 'bezier-easing';
export const EASING_FUNCTION = {
    linear: BezierEasing(0, 0, 1, 1),
    ease: BezierEasing(0.25, 0.1, 0.25, 1),
    'ease-in': BezierEasing(0.42, 0, 1, 1),
    'ease-out': BezierEasing(0, 0, 0.58, 1),
    'ease-in-out': BezierEasing(0.42, 0, 0.58, 1),
};
Now, let's design the API for switching to Landmark. Referencing the Web Animations API, we support the following parameters:
easingSupportseaselinearsame as CSSdurationPassing0will skip animation.onframeCallback at the frame duration the animationonfinishCallback when aniamtion ends
export class Camera {
    gotoLandmark(
        landmark: Landmark,
        options: Partial<{
            easing: string;
            duration: number;
            onframe: (t: number) => void;
            onfinish: () => void;
        }> = {},
    ) {}
}
If duration is passed in as 0, there is no animation effect; the camera parameters contained in the Landmark are used to update directly and trigger the end callback:
const { zoom, x, y, rotation } = landmark;

const endAnimation = () => {
  this.#zoom = zoom;
  this.#x = x;
  this.#y = y;
  this.#rotation = rotation;
  this.updateMatrix();
  if (onfinish) {
    onfinish();
  }
};

if (duration === 0) {
  endAnimation();
  return;
}
Any ongoing animations should be stopped before starting a new one (if applicable). Next, we implement the logic for each frame during the animation process. If the duration exceeds, the animation should end immediately:
this.cancelLandmarkAnimation();

let timeStart: number | undefined;
const destPosition: vec2 = [x, y];
const destZoomRotation: vec2 = [zoom, rotation];
const animate = (timestamp: number) => {
  if (timeStart === undefined) {
    timeStart = timestamp;
  }
  const elapsed = timestamp - timeStart;
  if (elapsed > duration) {
    endAnimation();
    return;
  }

  // Omit calculation for now.

  if (elapsed < duration) {
    if (onframe) {
      onframe(t);
    }
    this.#landmarkAnimationID = requestAnimationFrame(animate);
  }
};
requestAnimationFrame(animate);
Using the previously defined easing function to obtain the time value, we then use vec2.lerp for interpolation to derive the current camera parameters, which are finally applied to update the camera matrix:
// use the same ease function in animation system
const t = EASING_FUNCTION[easing](elapsed / duration);

const interPosition = vec2.create();
const interZoomRotation = vec2.fromValues(1, 0);

vec2.lerp(interPosition, [this.#x, this.#y], destPosition, t);
vec2.lerp(interZoomRotation, [this.zoom, this.#rotation], destZoomRotation, t);

this.#x = interPosition[0];
this.#y = interPosition[1];
this.#zoom = interZoomRotation[0];
this.#rotation = interZoomRotation[1];
this.updateMatrix();
There's a small optimization that can be made here: during the process, you can calculate the displacement of the camera position. If the distance is smaller than a certain threshold, there's no need to carry out the subsequent animation, and you can end it directly:
const dist = vec2.dist(interPosition, destPosition);
if (dist <= EPSILON) {
    endAnimation();
    return;
}
Go back to the example at the top of the page and give it a try. Click the button to return the camera to its initial state.