Lesson 3 - Scene graph and transform
In the last lesson we drew a circle, in this lesson you will learn the following:
- Transformations. Make shapes support pan, zoom, rotate, and skew transformations.
- Scene graph.
Finally, we will use the above features to realize a simple model of the Solar System.
(async () => {
    const { Canvas, Circle, Group } = Lesson3;
    const canvas = await Utils.createCanvas(Canvas, 400, 400);

    const solarSystem = new Group();
    const earthOrbit = new Group();
    const moonOrbit = new Group();

    const sun = new Circle({
        cx: 0,
        cy: 0,
        r: 100,
        fill: 'red',
    });
    const earth = new Circle({
        cx: 0,
        cy: 0,
        r: 50,
        fill: 'blue',
    });
    const moon = new Circle({
        cx: 0,
        cy: 0,
        r: 25,
        fill: 'yellow',
    });
    solarSystem.appendChild(sun);
    solarSystem.appendChild(earthOrbit);
    earthOrbit.appendChild(earth);
    earthOrbit.appendChild(moonOrbit);
    moonOrbit.appendChild(moon);

    solarSystem.position.x = 200;
    solarSystem.position.y = 200;
    earthOrbit.position.x = 100;
    moonOrbit.position.x = 100;

    canvas.appendChild(solarSystem);

    let id;
    const animate = () => {
        solarSystem.rotation += 0.01;
        earthOrbit.rotation += 0.02;
        canvas.render();
        id = requestAnimationFrame(animate);
    };
    animate();

    unsubscribe(() => {
        cancelAnimationFrame(id);
        canvas.destroy();
    });
    return canvas.getDOM();
})();
Transform
CSS Transform provides these transform: translate scale rotate and skew. The matrices behind these transformations can be found in Transformations - LearnOpenGL. Since our scene contains only 2D graphics, we only need a 3x3 matrix, and since the last row of [0, 0, 1] is fixed, we actually only need to store 6 elements of the matrix:
| a | c | tx|
| b | d | ty|
| 0 | 0 | 1 |
We add a transform attribute to our graph base class directly using @pixi/math, or of course gl-matrix.
import { Transform } from '@pixi/math';

export abstract class Shape {
    transform = new Transform();
}
Before adding more methods, let's introduce an important concept.
Local and world coordinates
Coordinate systems can be used to describe the position, rotation, and scaling of objects in a scene; the best known coordinate system is the Euclidean coordinate system. In graphics we also use the center of gravity coordinate system. Euclidean space can contain up to N dimensions, here we will only use two dimensions.
When we say "the moon revolves around the earth", we are actually ignoring objects other than the earth. In the moon's local coordinate system, it simply rotates around a point, even though in the world coordinate system of the entire solar system, the earth still rotates around the sun, and the moon ultimately follows the complex trajectory described above.
The concepts of local and world coordinate systems can be used in both 2D and 3D worlds. The image below from playcanvas shows the world coordinate system on the left, and you can see that the axes are always the same. The right side shows the local coordinate system of the cube, whose axes change as the object is transformed (in this case rotated), so if at this point this rotated object undergoes a translation in the positive direction of the X-axis (in red), it may run off the ground.

The world coordinate system is shared by all nodes in the scene graph, so it has a fixed origin (0, 0), and the orientation of the XYZ axes (XY axes in the 2D scene) are fixed, even if the box in the scene rotates itself, the world coordinate system will not change for it. But for its own local coordinate system, its origin is no longer (0, 0) but the position of the object itself, and the axes naturally change, as the name suggests, it is associated with the object itself.
Imagine that the box is moved "10 units along the X-axis (red)", which has a completely different meaning in a different coordinate system. Therefore, when we want to transform an object, we first have to specify the coordinate system in which it is located.
In addition, the local coordinate system is also called model coordinate system, which is more convenient when describing the transformation of the model itself. If we want to make each soldier turn his head, it is obviously easier to do it in the local coordinate system, because the transformation "turn" is relative to the head of each model.

We add methods for transformations in local and world coordinate systems to the graph base class, provided in @pixi/math:
export abstract class Shape {
get localTransform(): Matrix {
return this.transform.localTransform;
}
get worldTransform(): Matrix {
return this.transform.worldTransform;
}
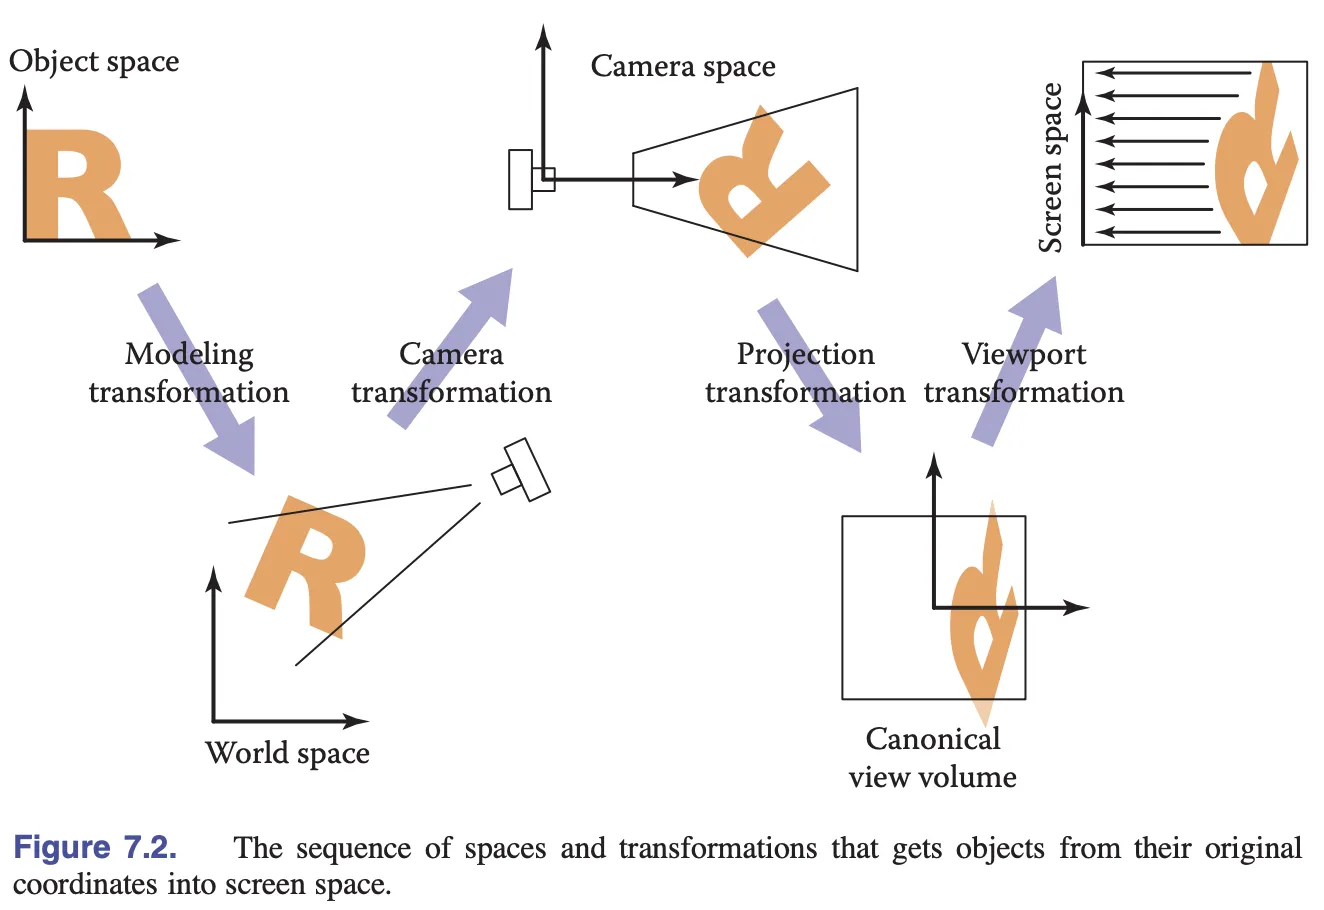
}The following figure from Fundamentals of Computer Graphics 4th Edition shows the local (object) coordinate system being transformed by a model transformation to the world coordinate system, then by a camera transformation to the camera coordinate system, then by a projection transformation to the clipping coordinate system (clip space/NDC), and finally by a viewport Then the camera transform to the camera coordinate system, then the projection transform to the clipping coordinate system (clip space/NDC) and finally the viewport transform to the screen coordinate system (screen/pixel space). We will introduce the camera later, for now we only need to care about the model transformation.
Next we need to pass the model transformation matrix into the shader to transform the vertex positions.
Alignment
In the Vertex Shader the model transformation matrix is passed in via Uniform and then left-multiplied with the position vector:
layout(std140) uniform ShapeUniforms {
  mat3 u_ModelMatrix;
};

vec2 position = (u_ModelMatrix * vec3(a_Position + a_Size * a_FragCoord, 1)).xy;
Naturally, we create a Float32Array of length 9 (a matrix of 3 * 3) directly:
this.#uniformBuffer = device.createBuffer({
    viewOrSize: Float32Array.BYTES_PER_ELEMENT * 9, // mat3
    usage: BufferUsage.UNIFORM,
    hint: BufferFrequencyHint.DYNAMIC,
});
But then the console will report an error that the Uniform Buffer we created is not long enough, what's going on?
[.WebGL-0x10800c78f00] GL_INVALID_OPERATION: It is undefined behaviour to use a uniform buffer that is too small.Here we need to introduce the concept of Memory layout, Uniform Block supports packed shared std140 std430 layout rules. Different layout rules will lead to different ways of storing and reading data in the buffer. The advantage of choosing std140 is that there are no layout differences between Programs (compared to packed), and there are no differences between OpenGL implementations (compared to shared), but the disadvantage is that you need to deal with alignment manually, and the documentation on the official website gives a warning about this, reminding us that we should try to avoid vec3 in order to circumvent the alignment:
Warning: Implementations sometimes get the std140 layout wrong for vec3 components. You are advised to manually pad your structures/arrays out and avoid using vec3 at all.
So what is alignment? Let's take vec3 as an example, which is 4 * 3 Bytes long but actually takes up 16. In practice the alignment rules are very complex, and here mat3 actually takes 4 * 12 Bytes of storage:
this.#uniformBuffer = device.createBuffer({
    viewOrSize: Float32Array.BYTES_PER_ELEMENT * 12, // mat3
    usage: BufferUsage.UNIFORM,
});
We need to manually add padding when writing data:
| a | c | tx|
| b | d | ty|
| 0 | 0 | 1 |
| padding | padding | padding |const PADDING = 0;
const { a, b, c, d, tx, ty } = this.worldTransform;
this.#uniformBuffer.setSubData(
0,
new Uint8Array(
new Float32Array([
a,
b,
0,
PADDING,
c,
d,
0,
PADDING,
tx,
ty,
1,
PADDING,
]).buffer,
),
);It's worth noting that the same Alignment of Uniform and Storage buffers is available in WGSL, and there's bytemuck in the Rust ecosystem to help automate alignment, the following example is from bevy:
use bytemuck::{Pod, Zeroable};

#[repr(C)]
#[derive(Copy, Clone, Pod, Zeroable)]
pub struct UiMaterialVertex {
    pub position: [f32; 3],
    pub uv: [f32; 2],
    pub border_widths: [f32; 4],
}
Let's add translation APIs such as translation, rotation and zoom to the graphics.
Translation
export abstract class Shape {
    get position(): ObservablePoint {
        return this.transform.position;
    }
    set position(value: IPointData) {
        this.transform.position.copyFrom(value);
    }

    get x(): number {
        return this.position.x;
    }
    set x(value: number) {
        this.transform.position.x = value;
    }

    get y(): number {
        return this.position.y;
    }
    set y(value: number) {
        this.transform.position.y = value;
    }
}
Usage is consistent with PIXI.js:
circle = call(() => {
    const { Circle } = Lesson3;
    return new Circle({
        cx: 100,
        cy: 100,
        r: 50,
        fill: 'red',
    });
});positionX = Inputs.range([0, 100], { label: 'position.x', value: 0, step: 1 });positionY = Inputs.range([0, 100], { label: 'position.y', value: 0, step: 1 });call(() => {
circle.position.x = positionX;
circle.position.y = positionY;
});(async () => {
const { Canvas } = Lesson3;
const canvas = await Utils.createCanvas(Canvas, 200, 200);
canvas.appendChild(circle);
let id;
const animate = () => {
canvas.render();
id = requestAnimationFrame(animate);
};
animate();
unsubscribe(() => {
cancelAnimationFrame(id);
canvas.destroy();
});
return canvas.getDOM();
})();Rotation
Rotation, scaling, and skew require that the transform center be specified, similar to transform-origin in CSS:
export abstract class Shape {
    get pivot(): ObservablePoint {
        return this.transform.pivot;
    }
    set pivot(value: IPointData) {
        this.transform.pivot.copyFrom(value);
    }
}export abstract class Shape {
get rotation(): number {
return this.transform.rotation;
}
set rotation(value: number) {
this.transform.rotation = value;
}
}circle2 = call(() => {
const { Circle } = Lesson3;
return new Circle({
cx: 0,
cy: 0,
r: 50,
fill: 'red',
});
});pivotX = Inputs.range([0, 100], { label: 'pivot.x', value: 0, step: 1 });pivotY = Inputs.range([0, 100], { label: 'pivot.y', value: 0, step: 1 });call(() => {
circle2.pivot.x = pivotX;
circle2.pivot.y = pivotY;
});(async () => {
const { Canvas } = Lesson3;
const canvas = await Utils.createCanvas(Canvas, 200, 200);
canvas.appendChild(circle2);
let id;
const animate = () => {
circle2.rotation += 0.01;
canvas.render();
id = requestAnimationFrame(animate);
};
animate();
unsubscribe(() => {
cancelAnimationFrame(id);
canvas.destroy();
});
return canvas.getDOM();
})();Scaling
export abstract class Shape {
    get scale(): ObservablePoint {
        return this.transform.scale;
    }
    set scale(value: IPointData) {
        this.transform.scale.copyFrom(value);
    }
}circle3 = call(() => {
const { Circle } = Lesson3;
return new Circle({
cx: 0,
cy: 0,
r: 50,
fill: 'red',
});
});pivotX2 = Inputs.range([0, 100], { label: 'pivot.x', value: 0, step: 1 });pivotY2 = Inputs.range([0, 100], { label: 'pivot.y', value: 0, step: 1 });scaleX = Inputs.range([0, 5], { label: 'scale.x', value: 1, step: 0.1 });scaleY = Inputs.range([0, 5], { label: 'scale.y', value: 1, step: 0.1 });call(() => {
circle3.pivot.x = pivotX2;
circle3.pivot.y = pivotY2;
circle3.scale.x = scaleX;
circle3.scale.y = scaleY;
circle3.position.x = 100;
circle3.position.y = 100;
});(async () => {
const { Canvas } = Lesson3;
const canvas = await Utils.createCanvas(Canvas, 200, 200);
canvas.appendChild(circle3);
let id;
const animate = () => {
canvas.render();
id = requestAnimationFrame(animate);
};
animate();
unsubscribe(() => {
cancelAnimationFrame(id);
canvas.destroy();
});
return canvas.getDOM();
})();Skew
export abstract class Shape {
    get skew(): ObservablePoint {
        return this.transform.skew;
    }
    set skew(value: IPointData) {
        this.transform.skew.copyFrom(value);
    }
}
SceneGraph
A SceneGraph is a data structure for organizing and managing 2D/3D virtual scenes and is a directed acyclic graph. SceneGraph provides two major capabilities:
- describe parent-child relationships
- automate some complex cascade calculations based on parent-child relationships.
The left panel in Figma shows the scene graph:
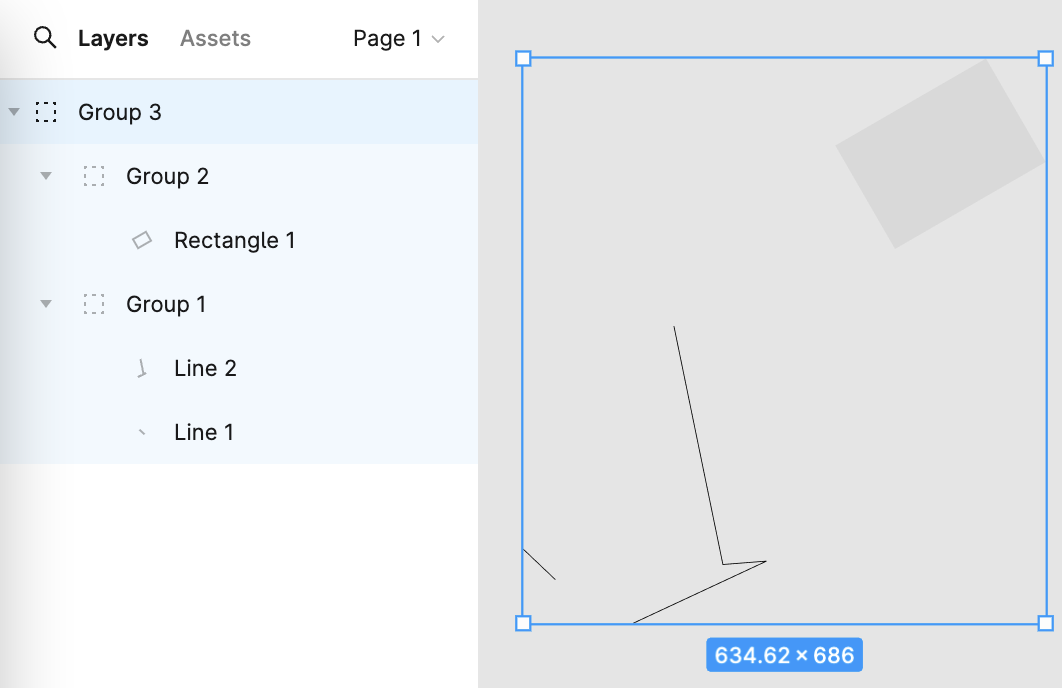
Imagine we need to build a simple solar system scenario with the following hierarchical relationships:
solarSystem
   |    |
   |   sun
   |
 earthOrbit
   |    |
   |  earth
   |
 moonOrbit
      |
     moon
Use this API description, where Group simply inherits the graphics base class and does not need to override the rendering methods:
const solarSystem = new Group();
const earthOrbit = new Group();
const moonOrbit = new Group();

const sun = new Circle({
    cx: 0,
    cy: 0,
    r: 100,
    fill: 'red',
});
const earth = new Circle({
    cx: 0,
    cy: 0,
    r: 50,
    fill: 'blue',
});
const moon = new Circle({
    cx: 0,
    cy: 0,
    r: 25,
    fill: 'yellow',
});
solarSystem.appendChild(sun);
solarSystem.appendChild(earthOrbit);
earthOrbit.appendChild(earth);
earthOrbit.appendChild(moonOrbit);
moonOrbit.appendChild(moon);
Parent-child relationships
Add parent and children properties for graphics:
export abstract class Shape {
    parent: Shape;
    readonly children: Shape[] = [];
}
Then we add append/removeChild node method. If the child node has already had a parent node added before, it is removed first. The setting of _parentID here is related to the implementation of @pixi/math, which is covered in the last subsection:
export abstract class Shape {
  appendChild(child: Shape) {
    if (child.parent) {
      child.parent.removeChild(child);
    }
    child.parent = this;
    child.transform._parentID = -1;
    this.children.push(child);

    return child;
  }
}
Traverse scene graph
With the hierarchy in place, we can traverse the entire scene graph using recursion, adding a util method here:
export function traverse(shape: Shape, callback: (shape: Shape) => void) {
    callback(shape);
    shape.children.forEach((child) => {
        traverse(child, callback);
    });
}
During canvas rendering, use the above util methods to render each graphic in turn:
export class Canvas {
  render() {
    const { hooks } = this.#pluginContext;
    hooks.beginFrame.call();
    this.#shapes.forEach((shape) => {
      traverse(shape, (s) => {
        hooks.render.call(s);
      });
    });
    hooks.endFrame.call();
  }
}
Update transform
In the scene graph, the transformation matrix of a child node in the world coordinate system is computed in the following way:
child's WorldTransform = parent's WorldTransform
    * child's LocalTransform
We complete the update of the transformation matrix before rendering each frame:
hooks.render.tap((shape) => {
  shape.transform.updateTransform(
    shape.parent ? shape.parent.transform : IDENTITY_TRANSFORM,
  );
  shape.render(this.#device, this.#renderPass, this.#uniformBuffer);
});
You might be concerned that if the graph is not transformed, does it still need to be updated every frame? After all, the whole scene graph needs to perform operations on every graph, which is a lot of overhead. We introduced this design pattern in Lesson 2 - Dirty flag, but now let's analyze the implementation of @pixi/math.
Each time a transformation occurs, the translation transformation, for example, just increments the version number _localID:
this.position = new ObservablePoint(this.onChange, this, 0, 0);

protected onChange(): void {
    this._localID++;
}
When updating the local transformation matrix, the version number is used to determine if the transformation has not occurred since the last time, otherwise the actual matrix operations are performed. When done, update the version number and force the world transformation matrix to be updated, which is done by resetting _parentID:
updateTransform(parentTransform: Transform): void {
    const lt = this.localTransform;
    if (this._localID !== this._currentLocalID) {
        // 执行实际矩阵运算
        lt.a = this._cx * this.scale.x;
        // ...
        this._currentLocalID = this._localID;
        this._parentID = -1;
    }
    if (this._parentID !== parentTransform._worldID) {
        this._parentID = parentTransform._worldID;
        this._worldID++;
    }
}
Remember the new appendChild method we added earlier? Since the parent has changed, we need to reset _parentID so that the matrix in the world coordinate system is recalculated when the next update comes:
appendChild(child: Shape) {
    child.transform._parentID = -1;
}
This pattern is also used in PIXI.js for operations with high overhead such as calculating the enclosing box.