课程 3 - 场景图和变换
上一节课中我们绘制了一个圆,在这节课中你将学习到以下内容:
- 变换。让图形支持平移、缩放、旋转、斜切变换。
- 场景图。
最后我们利用以上特性实现一个简单的“太阳系”模型。
(async () => {
    const { Canvas, Circle, Group } = Lesson3;

    const canvas = await Utils.createCanvas(Canvas, 400, 400);

    const solarSystem = new Group();
    const earthOrbit = new Group();
    const moonOrbit = new Group();

    const sun = new Circle({
        cx: 0,
        cy: 0,
        r: 100,
        fill: 'red',
    });
    const earth = new Circle({
        cx: 0,
        cy: 0,
        r: 50,
        fill: 'blue',
    });
    const moon = new Circle({
        cx: 0,
        cy: 0,
        r: 25,
        fill: 'yellow',
    });
    solarSystem.appendChild(sun);
    solarSystem.appendChild(earthOrbit);
    earthOrbit.appendChild(earth);
    earthOrbit.appendChild(moonOrbit);
    moonOrbit.appendChild(moon);

    solarSystem.position.x = 200;
    solarSystem.position.y = 200;
    earthOrbit.position.x = 100;
    moonOrbit.position.x = 100;

    canvas.appendChild(solarSystem);

    let id;
    const animate = () => {
        solarSystem.rotation += 0.01;
        earthOrbit.rotation += 0.02;
        canvas.render();
        id = requestAnimationFrame(animate);
    };
    animate();

    unsubscribe(() => {
        cancelAnimationFrame(id);
        canvas.destroy();
    });
    return canvas.getDOM();
})();
变换
CSS Transform 提供了 translate scale rotate skew 等变换。 关于这些变换背后对应的矩阵可以参考:Transformations - LearnOpenGL。由于我们的场景中只包含 2D 图形,因此仅需要 3x3 的矩阵,由于最后一行 [0, 0, 1] 都是固定的,实际上只需要存储矩阵中的 6 个元素:
| a | c | tx|
| b | d | ty|
| 0 | 0 | 1 |
我们直接使用 @pixi/math 给我们的图形基类增加一个 transform 属性,当然也可以选择 gl-matrix。
import { Transform } from '@pixi/math';

export abstract class Shape {
    transform = new Transform();
}
在增加更多方法前,我们先介绍一个重要的概念。
局部和世界坐标系
坐标系可以用来描述场景中物体的位置、旋转和缩放情况,最著名的坐标系是欧式坐标系。在图形学中我们还会使用到重心坐标系。欧式空间可以包含 N 维,这里我们只使用二维空间。
当我们在说“月亮绕着地球转”的时候,实际上已经忽略了地球以外的对象。在月亮的局部坐标系中,它只是单纯地绕着一个点旋转而已,尽管在整个太阳系这个世界坐标系下,地球还在绕着太阳旋转,月球最终沿着上面那个复杂轨迹运动。
在二维和三维世界中,都可以使用局部坐标系和世界坐标系的概念,下图来自 playcanvas,左侧为世界坐标系,你可以看到坐标轴是始终不变的。右侧展示的是立方体的局部坐标系,它的坐标轴随物体变换(这里是旋转)而改变,因此如果此时这个旋转后的物体发生了 X 轴(红色)正向的平移,它可能就跑地底下去了。

世界坐标系被整个场景图内的所有节点共享,因此它有一个固定的原点(0, 0),XYZ 三轴(二维场景中为 XY 轴)的朝向也都是固定的,即使场景中的这个盒子自身发生了旋转,世界坐标系对它来说也不会变化。但对于自身的局部坐标系而言,它的原点首先就不再是 (0, 0) 而是物体自身的位置,坐标轴自然也发生了变化,顾名思义它和物体本身相关联。
试想此时我们让这个盒子“沿 X 轴(红色)平移 10 个单位”,在不同坐标系下含义完全不同。因此当我们想对一个物体进行变换时,首先要指明所处的坐标系。
另外,局部坐标系也被称作模型坐标系,在描述模型自身的变换时更方便。下图中放置了两个士兵模型,如果我们想让每一个士兵转一下头,显然在局部坐标系做比较简单,因为“转动”这个变换就是相对于每个模型的头部而言的。

我们为图形基类增加局部和世界坐标系下变换的方法,在 @pixi/math 中已经提供:
export abstract class Shape {
get localTransform(): Matrix {
return this.transform.localTransform;
}
get worldTransform(): Matrix {
return this.transform.worldTransform;
}
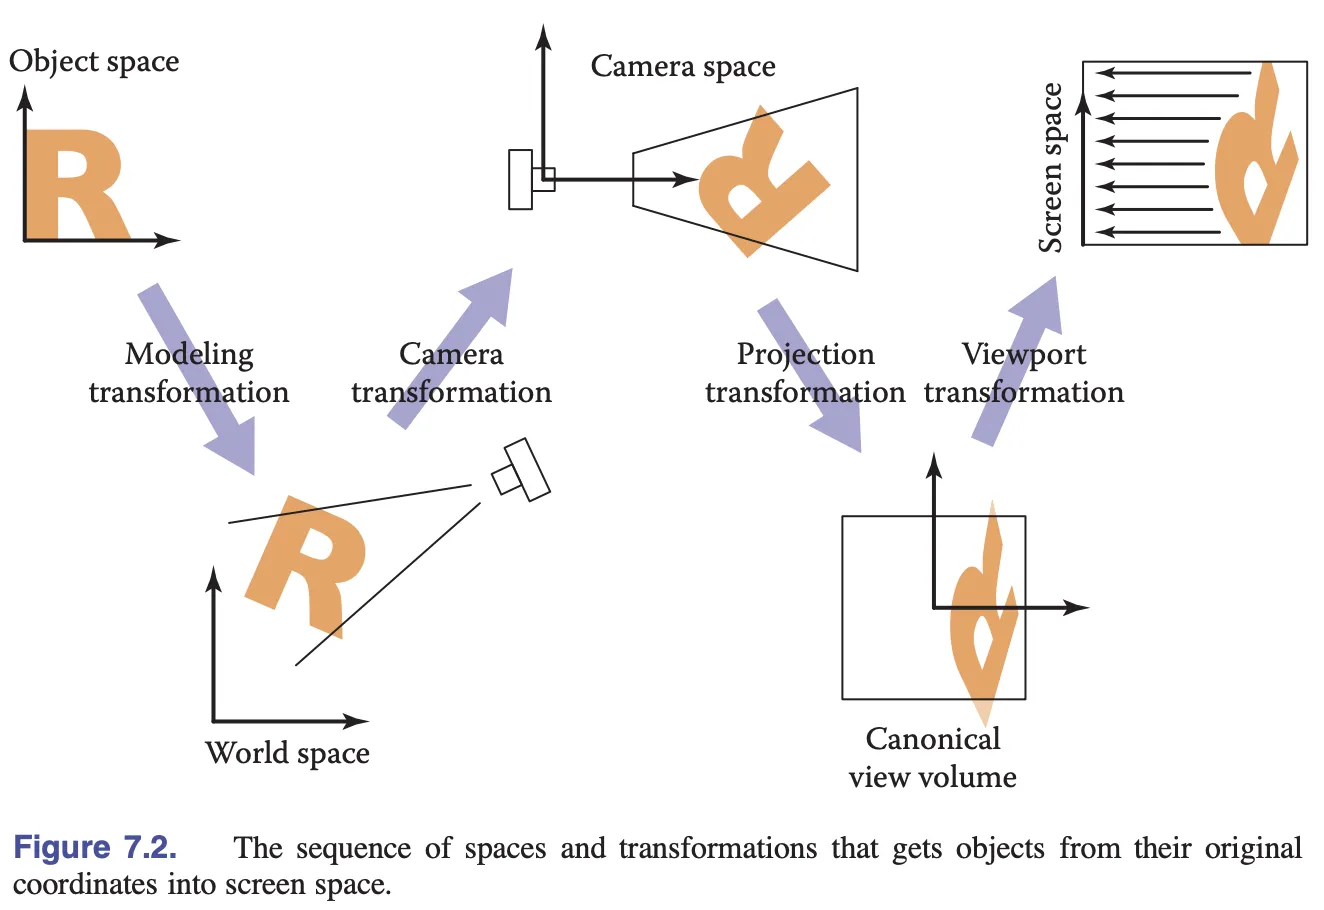
}下图来自 Fundamentals of Computer Graphics 4th Edition,展示了局部(对象)坐标系经过模型变换,转到了世界坐标系,接着通过相机变换转换到了相机坐标系,再通过投影变换进入裁剪坐标系(clip space/NDC),最后通过视口变换进入屏幕坐标系(screen/pixel space)。后续我们会介绍相机,现在我们只需要关心模型变换。
接下来我们需要将模型变换矩阵传入 Shader 中对顶点位置进行变换。
对齐问题
在 Vertex Shader 中模型变换矩阵通过 Uniform 传入,然后与位置向量左乘:
layout(std140) uniform ShapeUniforms {
  mat3 u_ModelMatrix;
};

vec2 position = (u_ModelMatrix * vec3(a_Position + a_Size * a_FragCoord, 1)).xy;
很自然的,我们直接创建一个长度为 9(3 * 3 的矩阵) 的 Float32Array:
this.#uniformBuffer = device.createBuffer({
    viewOrSize: Float32Array.BYTES_PER_ELEMENT * 9, // mat3
    usage: BufferUsage.UNIFORM,
    hint: BufferFrequencyHint.DYNAMIC,
});
但此时控制台会报错,认为我们创建的 Uniform Buffer 长度不够,这是怎么回事呢?
[.WebGL-0x10800c78f00] GL_INVALID_OPERATION: It is undefined behaviour to use a uniform buffer that is too small.这里需要引入 Memory layout 的概念,Uniform Block 支持 packed shared std140 std430 这些布局规则。不同的布局规则会导致存储和读取 Buffer 中数据方式的不同。我们这里选择 std140,优点是不同 Program 间不存在布局差异(相较 packed),不同 OpenGL 实现间也不存在差异(相较 shared),缺点就是需要手动处理对齐问题,官网文档也给出了这样的警告,提醒我们应当尽量避免使用 vec3 以规避对齐问题:
Warning: Implementations sometimes get the std140 layout wrong for vec3 components. You are advised to manually pad your structures/arrays out and avoid using vec3 at all.
那么什么是对齐呢?我们以 vec3 为例,长度为 4 * 3 Bytes 但它实际占用的是 16。实际使用中对齐规则非常复杂,这里的 mat3 实际需要 4 * 12 Bytes 的存储空间:
this.#uniformBuffer = device.createBuffer({
    viewOrSize: Float32Array.BYTES_PER_ELEMENT * 12, // mat3
    usage: BufferUsage.UNIFORM,
});
在写入数据时我们需要手动添加 padding:
| a | c | tx|
| b | d | ty|
| 0 | 0 | 1 |
| padding | padding | padding |const PADDING = 0;
const { a, b, c, d, tx, ty } = this.worldTransform;
this.#uniformBuffer.setSubData(
0,
new Uint8Array(
new Float32Array([
a,
b,
0,
PADDING,
c,
d,
0,
PADDING,
tx,
ty,
1,
PADDING,
]).buffer,
),
);值得一提的是 WGSL 中也有同样的 Alignment of Uniform and Storage buffers,在 Rust 生态中有 bytemuck 帮助自动处理对齐问题,下面的例子来自 bevy:
use bytemuck::{Pod, Zeroable};

#[repr(C)]
#[derive(Copy, Clone, Pod, Zeroable)]
pub struct UiMaterialVertex {
    pub position: [f32; 3],
    pub uv: [f32; 2],
    pub border_widths: [f32; 4],
}
下面我们为图形添加平移、缩放、旋转等变换 API。
平移
首先是 WebGL 2D Translation:
export abstract class Shape {
    get position(): ObservablePoint {
        return this.transform.position;
    }
    set position(value: IPointData) {
        this.transform.position.copyFrom(value);
    }

    get x(): number {
        return this.position.x;
    }
    set x(value: number) {
        this.transform.position.x = value;
    }

    get y(): number {
        return this.position.y;
    }
    set y(value: number) {
        this.transform.position.y = value;
    }
}
用法和 PIXI.js 保持一致:
circle = call(() => {
    const { Circle } = Lesson3;
    return new Circle({
        cx: 100,
        cy: 100,
        r: 50,
        fill: 'red',
    });
});positionX = Inputs.range([0, 100], { label: 'position.x', value: 0, step: 1 });positionY = Inputs.range([0, 100], { label: 'position.y', value: 0, step: 1 });call(() => {
circle.position.x = positionX;
circle.position.y = positionY;
});(async () => {
const { Canvas } = Lesson3;
const canvas = await Utils.createCanvas(Canvas, 200, 200);
canvas.appendChild(circle);
let id;
const animate = () => {
canvas.render();
id = requestAnimationFrame(animate);
};
animate();
unsubscribe(() => {
cancelAnimationFrame(id);
canvas.destroy();
});
return canvas.getDOM();
})();旋转
旋转、缩放和斜切都需要指定变换中心,类似 CSS 中的 transform-origin:
export abstract class Shape {
    get pivot(): ObservablePoint {
        return this.transform.pivot;
    }
    set pivot(value: IPointData) {
        this.transform.pivot.copyFrom(value);
    }
}export abstract class Shape {
get rotation(): number {
return this.transform.rotation;
}
set rotation(value: number) {
this.transform.rotation = value;
}
}circle2 = call(() => {
const { Circle } = Lesson3;
return new Circle({
cx: 0,
cy: 0,
r: 50,
fill: 'red',
});
});pivotX = Inputs.range([0, 100], { label: 'pivot.x', value: 0, step: 1 });pivotY = Inputs.range([0, 100], { label: 'pivot.y', value: 0, step: 1 });call(() => {
circle2.pivot.x = pivotX;
circle2.pivot.y = pivotY;
});(async () => {
const { Canvas } = Lesson3;
const canvas = await Utils.createCanvas(Canvas, 200, 200);
canvas.appendChild(circle2);
let id;
const animate = () => {
circle2.rotation += 0.01;
canvas.render();
id = requestAnimationFrame(animate);
};
animate();
unsubscribe(() => {
cancelAnimationFrame(id);
canvas.destroy();
});
return canvas.getDOM();
})();缩放
export abstract class Shape {
    get scale(): ObservablePoint {
        return this.transform.scale;
    }
    set scale(value: IPointData) {
        this.transform.scale.copyFrom(value);
    }
}circle3 = call(() => {
const { Circle } = Lesson3;
return new Circle({
cx: 0,
cy: 0,
r: 50,
fill: 'red',
});
});pivotX2 = Inputs.range([0, 100], { label: 'pivot.x', value: 0, step: 1 });pivotY2 = Inputs.range([0, 100], { label: 'pivot.y', value: 0, step: 1 });scaleX = Inputs.range([0, 5], { label: 'scale.x', value: 1, step: 0.1 });scaleY = Inputs.range([0, 5], { label: 'scale.y', value: 1, step: 0.1 });call(() => {
circle3.pivot.x = pivotX2;
circle3.pivot.y = pivotY2;
circle3.scale.x = scaleX;
circle3.scale.y = scaleY;
circle3.position.x = 100;
circle3.position.y = 100;
});(async () => {
const { Canvas } = Lesson3;
const canvas = await Utils.createCanvas(Canvas, 200, 200);
canvas.appendChild(circle3);
let id;
const animate = () => {
canvas.render();
id = requestAnimationFrame(animate);
};
animate();
unsubscribe(() => {
cancelAnimationFrame(id);
canvas.destroy();
});
return canvas.getDOM();
})();斜切
export abstract class Shape {
    get skew(): ObservablePoint {
        return this.transform.skew;
    }
    set skew(value: IPointData) {
        this.transform.skew.copyFrom(value);
    }
}
SceneGraph
SceneGraph 是组织和管理二维/三维虚拟场景的一种数据结构,是一个有向无环图。场景图提供了两大能力:
- 描述父子关系
- 自动完成基于父子关系的某些复杂级联计算
在 Figma 中左侧面板就展示了场景图:
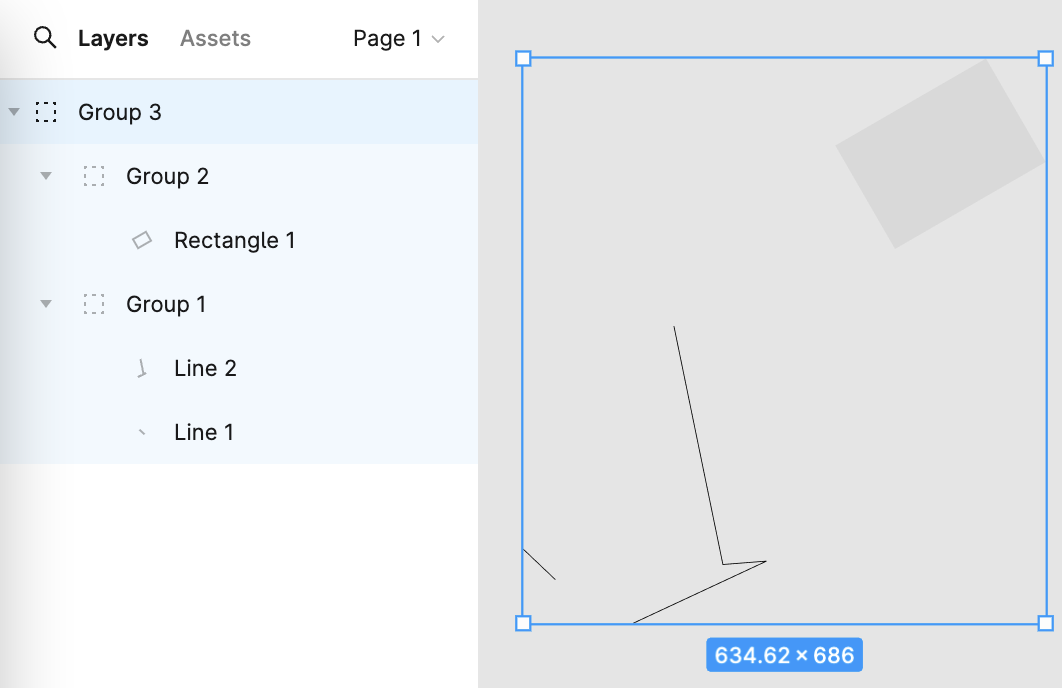
试想我们需要构建一个简单的太阳系场景,具有以下层次关系:
太阳系 solarSystem
   |    |
   |   太阳 sun
   |
 地球轨道 earthOrbit
   |    |
   |  地球 earth
   |
 月球轨道 moonOrbit
      |
     月球 moon
使用这样的 API 描述,其中 Group 只是简单继承了图形基类,并不需要重载渲染方法:
const solarSystem = new Group();
const earthOrbit = new Group();
const moonOrbit = new Group();

const sun = new Circle({
    cx: 0,
    cy: 0,
    r: 100,
    fill: 'red',
});
const earth = new Circle({
    cx: 0,
    cy: 0,
    r: 50,
    fill: 'blue',
});
const moon = new Circle({
    cx: 0,
    cy: 0,
    r: 25,
    fill: 'yellow',
});
solarSystem.appendChild(sun);
solarSystem.appendChild(earthOrbit);
earthOrbit.appendChild(earth);
earthOrbit.appendChild(moonOrbit);
moonOrbit.appendChild(moon);
这里我们使用了一些新增的 API。
父子关系
首先为图形基类增加 parent 和 children 两个属性:
export abstract class Shape {
    parent: Shape;
    readonly children: Shape[] = [];
}
然后新增添加/移除子节点方法。如果子节点之前已经添加过父节点了,首先移除。这里对 _parentID 的设置与 @pixi/math 的实现有关,我们放到最后一小节介绍:
export abstract class Shape {
  appendChild(child: Shape) {
    if (child.parent) {
      child.parent.removeChild(child);
    }
    child.parent = this;
    child.transform._parentID = -1;
    this.children.push(child);

    return child;
  }
}
遍历场景图
有了层次关系,我们就可以使用递归遍历整个场景图,这里增加一个工具方法:
export function traverse(shape: Shape, callback: (shape: Shape) => void) {
    callback(shape);
    shape.children.forEach((child) => {
        traverse(child, callback);
    });
}
在画布渲染时,使用上述工具方法依次渲染每个图形:
export class Canvas {
  render() {
    const { hooks } = this.#pluginContext;
    hooks.beginFrame.call();
    this.#shapes.forEach((shape) => {
      traverse(shape, (s) => {
        hooks.render.call(s);
      });
    });
    hooks.endFrame.call();
  }
}
更新变换矩阵
在场景图中,子节点在世界坐标系下的变换矩阵通过如下方式计算:
child's WorldTransform = parent's WorldTransform
    * child's LocalTransform
我们在每一帧渲染前完成变换矩阵的更新:
hooks.render.tap((shape) => {
  shape.transform.updateTransform(
    shape.parent ? shape.parent.transform : IDENTITY_TRANSFORM,
  );
  shape.render(this.#device, this.#renderPass, this.#uniformBuffer);
});
你可能会担心,如果图形并没有发生变换,还需要每一帧都进行更新吗?毕竟整个场景图中每个图形都需要执行运算,这个开销可不小。在 Lesson 2 - 脏检查 一节中我们介绍过这种设计模式,现在让我们分析一下 @pixi/math 的实现。
每次变换发生时,以平移变换为例,只是递增 _localID 这个版本号:
this.position = new ObservablePoint(this.onChange, this, 0, 0);

protected onChange(): void {
    this._localID++;
}
在更新局部变换矩阵时,通过版本号判断,如果距离上次并没有发生变换则跳过,否则才执行实际矩阵运算。完成后更新版本号,并强制更新世界变换矩阵,通过重置 _parentID 完成:
updateTransform(parentTransform: Transform): void {
    const lt = this.localTransform;
    if (this._localID !== this._currentLocalID) {
        // 执行实际矩阵运算
        lt.a = this._cx * this.scale.x;
        // ...
        this._currentLocalID = this._localID;
        this._parentID = -1;
    }
    if (this._parentID !== parentTransform._worldID) {
        this._parentID = parentTransform._worldID;
        this._worldID++;
    }
}
还记得之前我们新增的 appendChild 方法吗?由于父节点发生了变化,我们需要重置 _parentID,这样下一次更新到来时,世界坐标系下的矩阵就会重新计算:
appendChild(child: Shape) {
    child.transform._parentID = -1;
}
在 PIXI.js 中计算包围盒等开销较大的操作也都使用了这种模式。