课程 4 - 相机
在这节课中你将学习到以下内容:
- 相机是什么?
- 投影变换。
- 相机变换。通过一个插件实现平移、旋转和缩放功能。
- 相机动画。平滑过渡到任意相机状态。
我们可以通过控制相机改变画布展示的内容,按住并拖拽鼠标可以平移;按住 Shift 并拖拽可以绕指定点旋转;鼠标滚轮可以按指定点进行缩放;点按按钮回到初始状态并带有平滑过渡效果:
$button = call(() => {
    const $button = document.createElement('button');
    $button.textContent = 'FlyTo origin';
    return $button;
});(async () => {
const { Canvas, Circle, Group } = Lesson4;
const canvas = await Utils.createCanvas(Canvas, 400, 400);
const solarSystem = new Group();
const earthOrbit = new Group();
const moonOrbit = new Group();
const sun = new Circle({
cx: 0,
cy: 0,
r: 100,
fill: 'red',
});
const earth = new Circle({
cx: 0,
cy: 0,
r: 50,
fill: 'blue',
});
const moon = new Circle({
cx: 0,
cy: 0,
r: 25,
fill: 'yellow',
});
solarSystem.appendChild(sun);
solarSystem.appendChild(earthOrbit);
earthOrbit.appendChild(earth);
earthOrbit.appendChild(moonOrbit);
moonOrbit.appendChild(moon);
solarSystem.position.x = 200;
solarSystem.position.y = 200;
earthOrbit.position.x = 100;
moonOrbit.position.x = 100;
canvas.appendChild(solarSystem);
let id;
const animate = () => {
solarSystem.rotation += 0.01;
earthOrbit.rotation += 0.02;
canvas.render();
id = requestAnimationFrame(animate);
};
animate();
unsubscribe(() => {
cancelAnimationFrame(id);
canvas.destroy();
});
const landmark = canvas.camera.createLandmark({
x: 0,
y: 0,
zoom: 1,
rotation: 0,
});
$button.onclick = () => {
canvas.camera.gotoLandmark(landmark, {
duration: 1000,
easing: 'ease',
});
};
return canvas.getDOM();
})();相机是什么
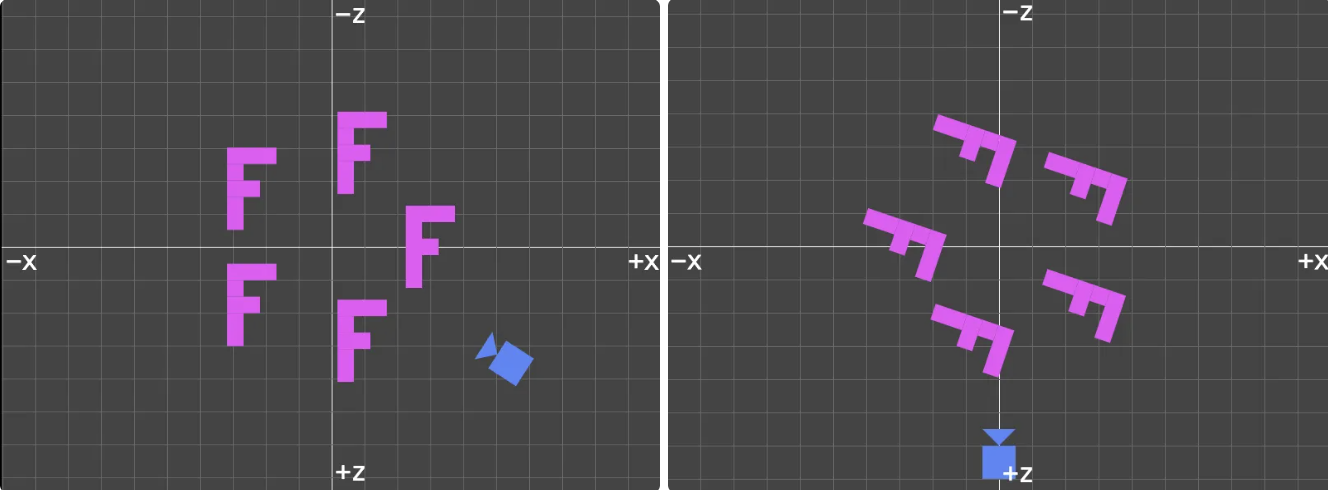
首先需要明确的是无论是 WebGL,WebGPU 还是 WebXR 都没有相机相关的 API。但我们可以通过一个虚拟的相机(Camera)描述观察世界的角度。其中视点、相机位置都会影响最终的成像,它适用于 2D 和 3D 场景。通过控制相机,我们能轻松实现某些过去需要移动整个画布的操作,甚至能实现相机动画。下图来自 WebGL 3D - Cameras 展示了上帝视角下 XZ 平面的内容,如果想实现同样的视觉效果,移动相机(左图)相比旋转整个画布内的全部对象(右图)要更加符合直觉,并且在实现中性能更高,我们很快就将看到这一点:
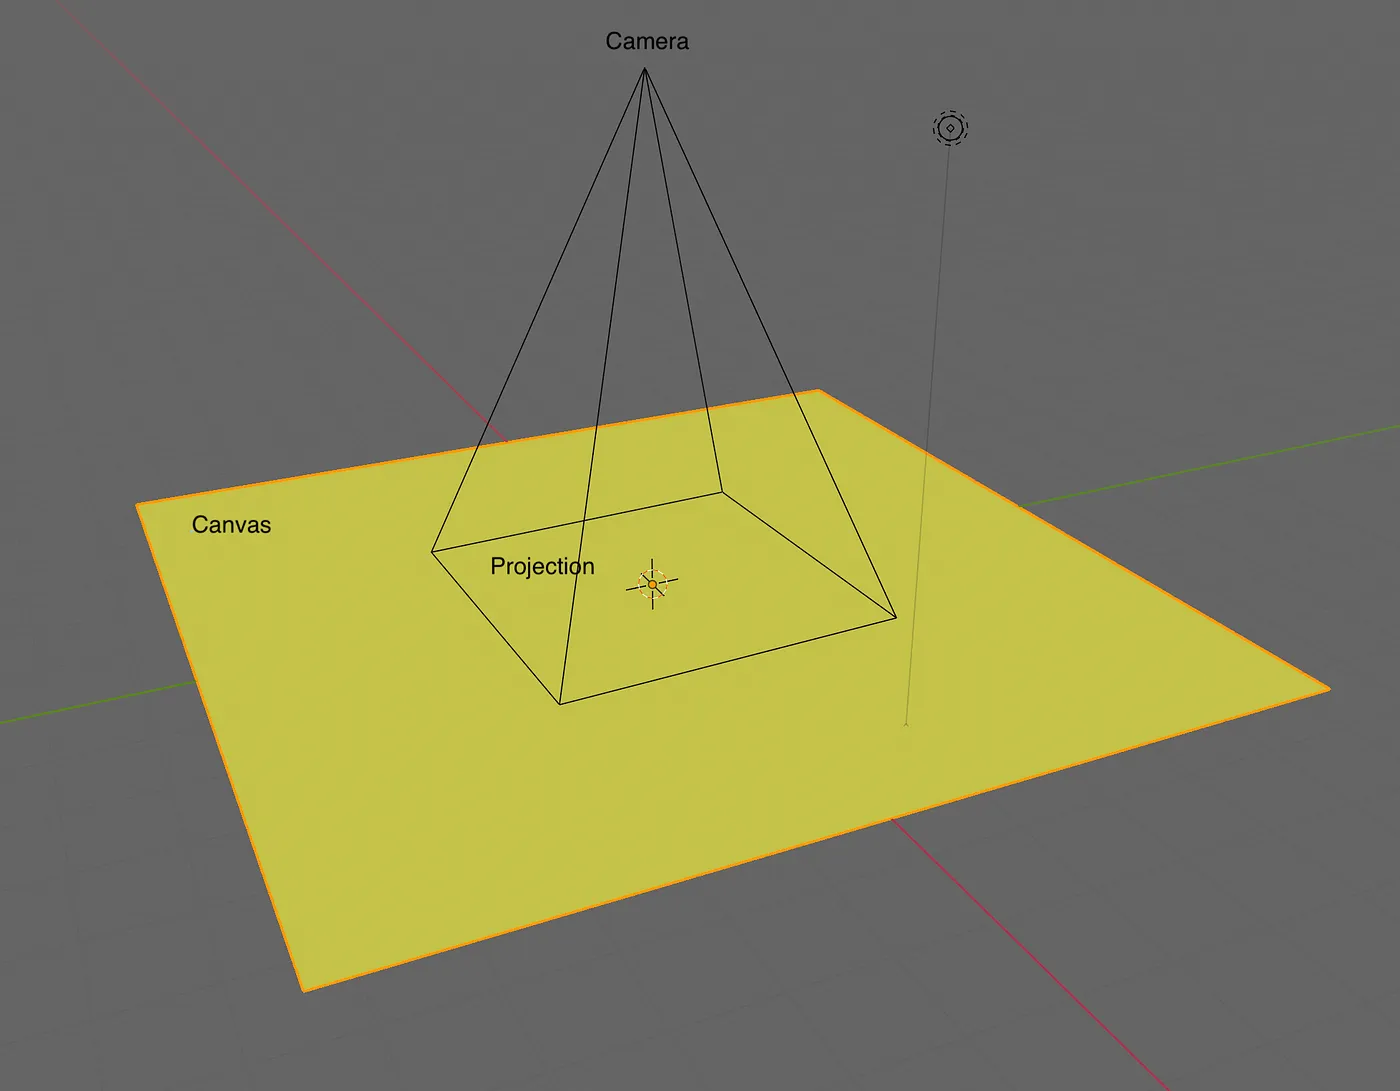
我们的画布位于 XY 平面上,相机从屏幕外向内观察,下图来自:How to Create a Figma-like Infinite Canvas in WebGL。当我们想向左平移画布时,对应相机向右平移:
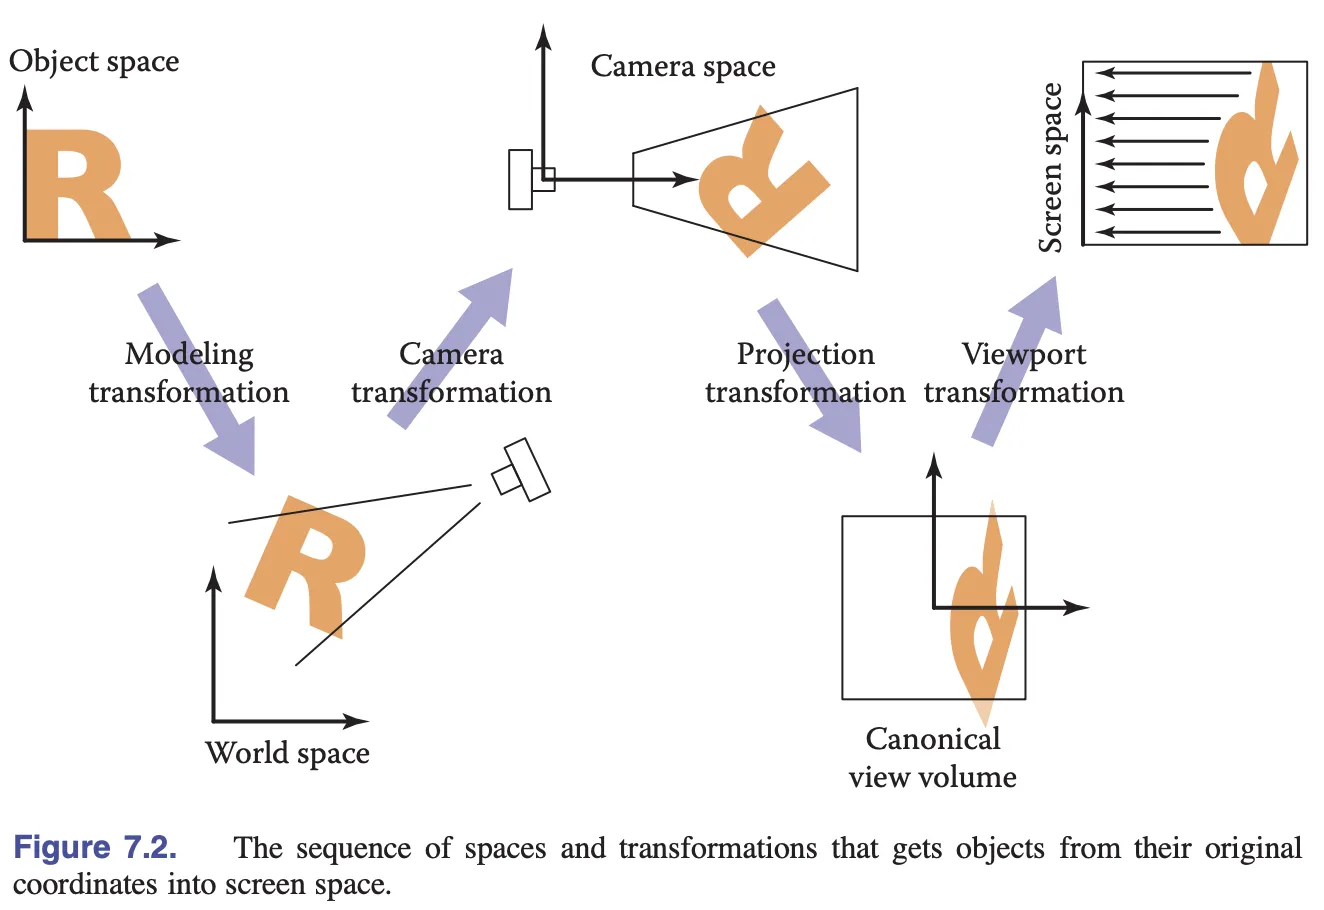
先来回顾一下将对象从模型空间变换到屏幕空间的各个阶段,上一课中已经介绍了模型变换,本节课会介绍投影变换和相机变换。
投影变换
首先回顾下之前从像素空间到裁剪空间的变换:
// Pixel space to [0, 1] (Screen space)
vec2 zeroToOne = position / u_Resolution;

// Convert from [0, 1] to [0, 2]
vec2 zeroToTwo = zeroToOne * 2.0;

// Convert from [0, 2] to [-1, 1] (NDC/clip space)
vec2 clipSpace = zeroToTwo - 1.0;

// Flip Y axis
gl_Position = vec4(clipSpace * vec2(1, -1), 0.0, 1.0);
如果能通过一次投影变换完成,代码将会精简不少,例如我们可以直接左乘模型变换矩阵:
layout(std140) uniform SceneUniforms {
  mat3 u_ProjectionMatrix;
};

gl_Position = vec4((u_ProjectionMatrix
    * u_ModelMatrix
    * vec3(position, 1)).xy, 0, 1);
2D 投影变换非常容易实现,只需要提供 width 和 height,Shader 中除以 u_Resolution 对应这里的 / width 和 / height:
[2 / width, 0, 0, 0, -2 / height, 0, -1, 1, 1];我们直接使用 gl-matrix 提供的 projection 方法,感兴趣的话可以查看它的源码,实现是一模一样的。当画布发生 resize 时也需要调用该方法重新计算:
export class Camera {
    #projectionMatrix = mat3.create();

    get projectionMatrix() {
        return this.#projectionMatrix;
    }

    projection(width: number, height: number) {
        mat3.projection(this.#projectionMatrix, width, height);
    }
}
但我们不能直接将 projectionMatrix 传入,原因是上一课我们提到的 对齐问题,我们需要为 mat3 添加 padding 再传入 Shader:
export function paddingMat3(matrix: mat3) {
    return [
        matrix[0],
        matrix[1],
        matrix[2],
        0,
        matrix[3],
        matrix[4],
        matrix[5],
        0,
        matrix[6],
        matrix[7],
        matrix[8],
        0,
    ];
}
最后我们在画布初始化时同步创建相机,后续通过 canvas.camera 访问它:
export class Canvas {
    #camera: Camera;
    get camera() {
        return this.#camera;
    }

    constructor() {
        const camera = new Camera(width / dpr, height / dpr);
        this.#camera = camera;
    }
}
下面让我们考虑相机的变换问题,例如平移。
相机变换
同样相机变换也可以用矩阵表示,完成后我们在 Shader 中可以通过如下方式使用。相比计算并更新每个图形的模型变换矩阵 u_ModelMatrix,全局一次性更新相机变换矩阵效率更高:
layout(std140) uniform SceneUniforms {
  mat3 u_ProjectionMatrix;
  mat3 u_ViewMatrix;
};

gl_Position = vec4((u_ProjectionMatrix
    * u_ViewMatrix
    * u_ModelMatrix
    * vec3(position, 1)).xy, 0, 1);
相机变换矩阵应与相机在世界坐标系中的变换相反,正如开头我们举的例子,相机向右移动对应画面向左移动,这里使用 gl-matrix 提供的 invert 方法求逆矩阵。同时增加其他 getter 例如 projectionMatrix * viewMatrix 供后续使用:
export class Camera {
  #matrix = mat3.create();
  private updateMatrix() {
    mat3.invert(this.#viewMatrix, this.#matrix);
    this.updateViewProjectionMatrix();
  }

  get viewMatrix() {
    return this.#viewMatrix;
  }

  get viewProjectionMatrix() {
    return this.#viewProjectionMatrix;
  }

  get viewProjectionMatrixInv() {
    return this.#viewProjectionMatrixInv;
  }
}
平移
在 infinitecanvas 对无限画布的定义中,“延展性” 是通过画布级的平移体现的:

现在让我们来实现基础相机功能,相比 3D 相机要简单很多,支持平移 x/y 旋转 rotation 和缩放 zoom,这里没有使用 scaling 命名的原因是 zoom 更常用(例如 Three.js 中的 OrthographicCamera.zoom):
export class Camera {
    #zoom = 1;
    #x = 0;
    #y = 0;
    #rotation = 0;

    private updateMatrix() {
        const zoomScale = 1 / this.#zoom;
        mat3.identity(this.#matrix);
        mat3.translate(this.#matrix, this.#matrix, [this.#x, this.#y]);
        mat3.rotate(this.#matrix, this.#matrix, this.#rotation);
        mat3.scale(this.#matrix, this.#matrix, [zoomScale, zoomScale]);
        mat3.invert(this.#viewMatrix, this.#matrix);
        this.updateViewProjectionMatrix();
    }
}
当我们使用 camera.x += 100; 对相机进行平移时,需要重新计算相机矩阵:
export class Camera {
    set x(x: number) {
        if (this.#x !== x) {
            this.#x = x;
            this.updateMatrix();
        }
    }
}
试试效果,通过拖拽 Slider 来移动相机:
canvas = call(() => {
    const { Canvas } = Lesson4;
    return Utils.createCanvas(Canvas, 400, 400);
});positionX = Inputs.range([0, 100], { label: 'camera.x', value: 0, step: 1 });positionY = Inputs.range([0, 100], { label: 'camera.y', value: 0, step: 1 });call(() => {
const camera = canvas.camera;
camera.x = positionX;
camera.y = positionY;
});(async () => {
const { Circle, Group } = Lesson4;
canvas.getDOM().style.pointerEvents = 'none';
const solarSystem = new Group();
const earthOrbit = new Group();
const moonOrbit = new Group();
const sun = new Circle({
cx: 0,
cy: 0,
r: 100,
fill: 'red',
});
const earth = new Circle({
cx: 0,
cy: 0,
r: 50,
fill: 'blue',
});
const moon = new Circle({
cx: 0,
cy: 0,
r: 25,
fill: 'yellow',
});
solarSystem.appendChild(sun);
solarSystem.appendChild(earthOrbit);
earthOrbit.appendChild(earth);
earthOrbit.appendChild(moonOrbit);
moonOrbit.appendChild(moon);
solarSystem.position.x = 200;
solarSystem.position.y = 200;
earthOrbit.position.x = 100;
moonOrbit.position.x = 100;
canvas.appendChild(solarSystem);
let id;
const animate = () => {
solarSystem.rotation += 0.01;
earthOrbit.rotation += 0.02;
canvas.render();
id = requestAnimationFrame(animate);
};
animate();
unsubscribe(() => {
cancelAnimationFrame(id);
canvas.destroy();
});
return canvas.getDOM();
})();看起来不错,如果能通过鼠标拖拽交互就更自然了。
增加插件
我们决定通过插件实现这一功能:
export class CameraControl implements Plugin {}

[new CameraControl(), new Renderer()].forEach((plugin) => {
  plugin.apply(this.#pluginContext);
});
参考 How to implement zoom from mouse in 2D WebGL,我们将鼠标事件对象包含的坐标,从画布坐标转换到裁剪坐标系:
function getClipSpaceMousePosition(e: MouseEvent): vec2 {
    // 当前鼠标位置在 CSS 坐标系下的坐标
    const rect = canvas.getBoundingClientRect();
    const cssX = e.clientX - rect.left;
    const cssY = e.clientY - rect.top;

    // 归一化到 [0, 1]
    const normalizedX = cssX / canvas.clientWidth;
    const normalizedY = cssY / canvas.clientHeight;

    // 转换到裁剪坐标系下
    const clipX = normalizedX * 2 - 1;
    const clipY = normalizedY * -2 + 1;

    return [clipX, clipY];
}
接下来监听 mousedown 事件,处理后续而非全局的 mousemove 和 mouseup 事件。
canvas.addEventListener('mousedown', (e) => {
    e.preventDefault();
    window.addEventListener('mousemove', handleMouseMove);
    window.addEventListener('mouseup', handleMouseUp);

    // 相机投影矩阵的逆矩阵
    mat3.copy(startInvertViewProjectionMatrix, camera.viewProjectionMatrixInv);
    // 记录下相机在世界坐标系下的位置
    startCameraX = camera.x;
    startCameraY = camera.y;
    // 将当前鼠标位置变换到世界坐标系下
    startPos = vec2.transformMat3(
        startPos,
        getClipSpaceMousePosition(e),
        startInvViewProjMatrix,
    );
});
需要记录以下变量:
startInvViewProjMatrix相机投影矩阵的逆矩阵startCameraX世界坐标系下相机 X 坐标startCameraY世界坐标系下相机 Y 坐标startPos世界坐标系下当前鼠标位置。通过 NDC 坐标系下坐标与相机投影矩阵的逆矩阵变换得到
抬起鼠标时解绑事件监听器,此次拖拽交互结束:
function handleMouseUp(e) {
    window.removeEventListener('mousemove', handleMouseMove);
    window.removeEventListener('mouseup', handleMouseUp);
}
鼠标移动时移动相机,同样需要转换到世界坐标系下,再与之前 mousedown 保存的鼠标位置相减得到移动的距离:
function handleMouseMove(e: MouseEvent) {
    moveCamera(e);
}

function moveCamera(e: MouseEvent) {
    const pos = vec2.transformMat3(
        vec2.create(),
        getClipSpaceMousePosition(e),
        startInvertViewProjectionMatrix,
    );

    camera.x = startCameraX + startPos[0] - pos[0];
    camera.y = startCameraY + startPos[1] - pos[1];
}
可以回到页面顶部的例子中,尝试拖拽画布。
旋转
旋转对于画布来说显然不是一个重要的特性,但一位 FigJam 用户在论坛提过能否支持:Rotate canvas,因为画布稍稍旋转一定角度更符合自己平时的使用习惯。
我们希望支持按住 Shift 同时拖拽鼠标完成画布旋转,在 mousedown 事件监听器中通过 KeyboardEvent: shiftKey 判断此时是否进入旋转模式:
canvas.addEventListener('mousedown', (e) => {
  rotate = e.shiftKey;
});

function handleMouseMove(e: MouseEvent) {
  if (rotate) {
    rotateCamera(e);
  } else {
    moveCamera(e);
  }
}
在旋转相机模式下,鼠标移动的距离将作为旋转角度。接下来构造世界坐标系下绕指定点旋转的变换矩阵,可以参考 transform-origin,然后对相机矩阵应用这个变换,最后从矩阵中提取各个参数:
function rotateCamera(e: MouseEvent) {
    // 移动距离转换成旋转角度
    const delta = (e.clientX - startMousePos[0]) / 100;

    // 构造绕指定点旋转的变换矩阵
    const camMat = mat3.create();
    mat3.translate(camMat, camMat, [startPos[0], startPos[1]]);
    mat3.rotate(camMat, camMat, delta);
    mat3.translate(camMat, camMat, [-startPos[0], -startPos[1]]);

    // 应用变换
    camera.x = startCameraX;
    camera.y = startCameraY;
    camera.rotation = startCameraRotation;
    mat3.multiply(camMat, camMat, camera.matrix);

    // 重新设置相机参数
    camera.x = camMat[6];
    camera.y = camMat[7];
    camera.rotation = startCameraRotation + delta;
}
可以回到页面顶部的例子中,尝试按住 Shift 并拖拽画布。
指定点缩放
在电影摄影或视频制作中,zoom 一词通常指的是改变相机镜头的焦距来放大或缩小画面的拍摄手法,在中文中翻译为“变焦”。拉近拉远可以造成放大缩小的效果,在 3D 编程中可以通过改变相机的视野(Field of View)或缩放变换实现,我们选择后者。
在无限画布中除了平移,缩放也是很常见的操作,尤其是按指定点缩放:

监听 wheel 事件,首先记录下缩放前鼠标所在位置,缩放更新相机矩阵后再计算,两者位置差就是相机需要移动的距离:
canvas.addEventListener('wheel', (e) => {
    e.preventDefault();
    const position = getClipSpaceMousePosition(e);

    // 记录下缩放前鼠标在世界坐标系下位置
    const [preZoomX, preZoomY] = vec2.transformMat3(
        vec2.create(),
        position,
        camera.viewProjectionMatrixInv,
    );

    // 相机缩放系数
    const newZoom = camera.zoom * Math.pow(2, e.deltaY * -0.01);
    camera.zoom = Math.max(MIN_ZOOM, Math.min(MAX_ZOOM, newZoom));

    // 缩放后鼠标在世界坐标系下位置
    const [postZoomX, postZoomY] = vec2.transformMat3(
        vec2.create(),
        position,
        camera.viewProjectionMatrixInv,
    );

    // 移动相机
    camera.x += preZoomX - postZoomX;
    camera.y += preZoomY - postZoomY;
});
PointerEvent
到目前为止我们监听的都是 MouseEvent,后续在实现事件系统时我们会介绍 PointerEvent,到那时候我们会回来修改 CameraControl 插件事件监听部分的代码,让它支持例如触摸屏等输入设备。

现在让我们进入下一个话题,如何让相机的运动效果更自然。
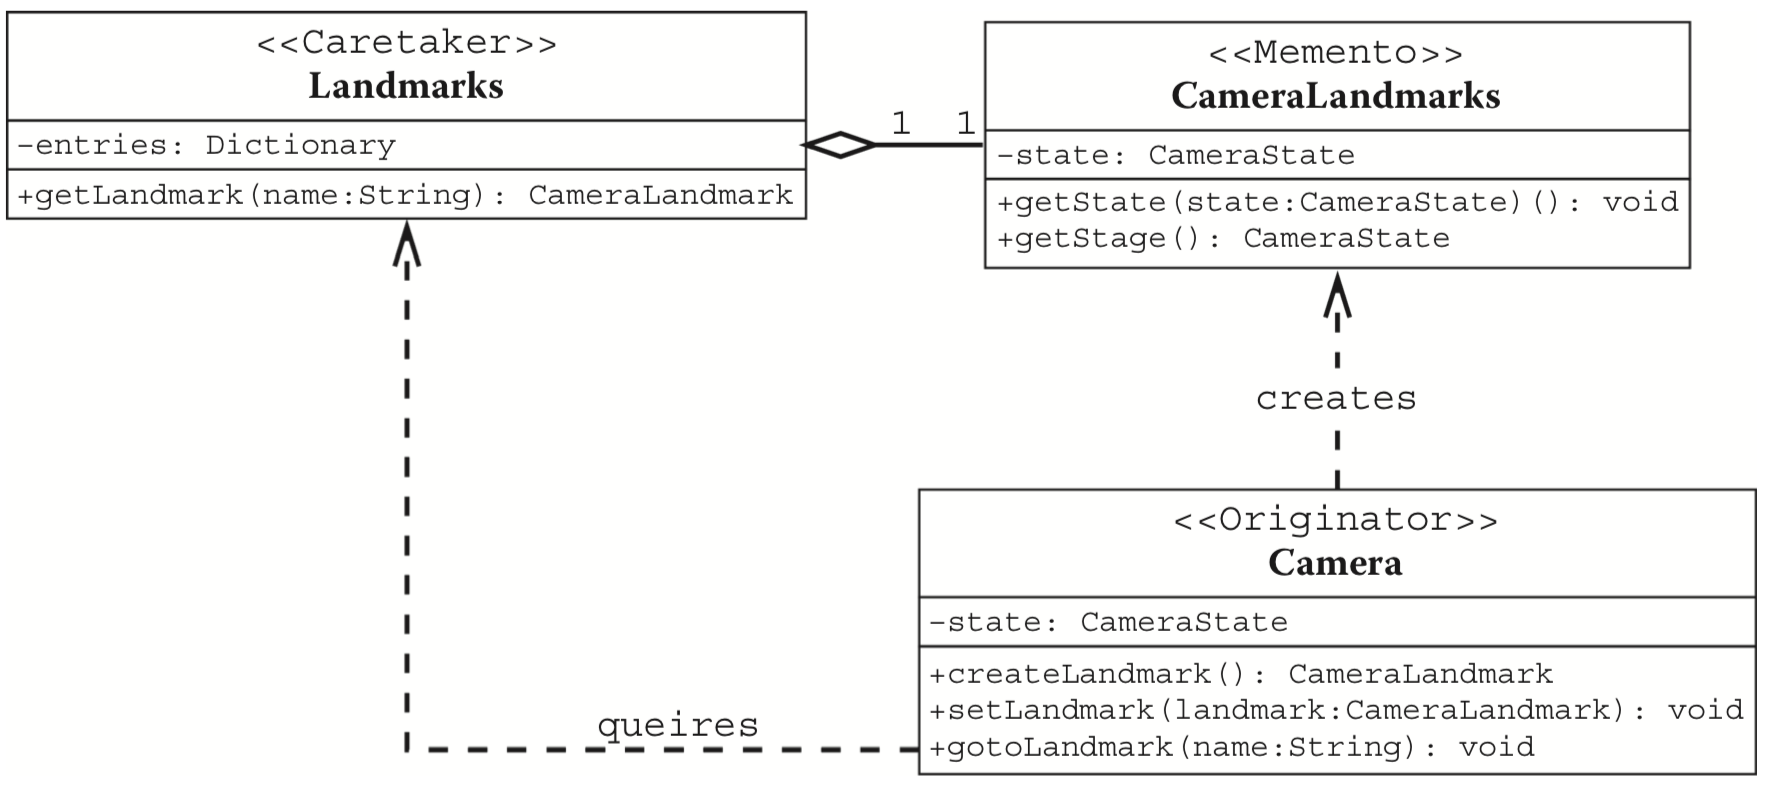
相机动画
Mapbox 提供了 flyTo - Mapbox 方法,可以在不同地点间进行平滑的移动。下面我们参考 WebGL Insights - 23.Designing Cameras for WebGL Applications 来实现相机动画,在任意相机状态间平滑过渡。
期望的相关 API 使用方式如下:
- 创建一个
Landmark,它可以代表当前相机的状态,也可以设置位置、旋转角度、缩放等参数。 - 让相机从当前状态切换到指定
Landmark,过程中包含平滑过渡效果。
const landmark = camera.createLandmark({ zoom: 2 });
camera.gotoLandmark(landmark, { duration: 300 });
创建 Landmark
Landmark 需要包含相机参数:
export interface Landmark {
    zoom: number;
    x: number;
    y: number;
    rotation: number;
}
创建 Landmark 其实就是简单保存相机参数,如果用户传入则覆盖:
export class Camera {
    createLandmark(params: Partial<Landmark>): Landmark {
        return {
            zoom: this.#zoom,
            x: this.#x,
            y: this.#y,
            rotation: this.#rotation,
            ...params,
        };
    }
}
动画效果
动画效果取决于缓动函数,我们使用 bezier-easing 实现了一些常用的 Cubic Bézier easing functions:
import BezierEasing from 'bezier-easing';
export const EASING_FUNCTION = {
    linear: BezierEasing(0, 0, 1, 1),
    ease: BezierEasing(0.25, 0.1, 0.25, 1),
    'ease-in': BezierEasing(0.42, 0, 1, 1),
    'ease-out': BezierEasing(0, 0, 0.58, 1),
    'ease-in-out': BezierEasing(0.42, 0, 0.58, 1),
};
下面来设计切换到 Landmark 的 API,参考 Web Animations API 我们支持如下参数:
easing缓动函数,支持easelinear这样的字符串,和 CSS 保持一致duration动画持续时间。如果传入0则没有动画效果onframe动画持续过程中每一帧的回调函数onfinish动画结束后的回调函数
export class Camera {
    gotoLandmark(
        landmark: Landmark,
        options: Partial<{
            easing: string;
            duration: number;
            onframe: (t: number) => void;
            onfinish: () => void;
        }> = {},
    ) {}
}
duration 如果传入 0 则没有动画效果,直接使用 Landmark 包含的相机参数进行更新并触发结束回调:
const { zoom, x, y, rotation } = landmark;

const endAnimation = () => {
  this.#zoom = zoom;
  this.#x = x;
  this.#y = y;
  this.#rotation = rotation;
  this.updateMatrix();
  if (onfinish) {
    onfinish();
  }
};

if (duration === 0) {
  endAnimation();
  return;
}
首先动画开始前先结束正在进行的动画(如有),接着来实现动画过程中每一帧的逻辑,持续时间超过 duration 立即结束:
this.cancelLandmarkAnimation();

let timeStart: number | undefined;
const destPosition: vec2 = [x, y];
const destZoomRotation: vec2 = [zoom, rotation];
const animate = (timestamp: number) => {
  if (timeStart === undefined) {
    timeStart = timestamp;
  }
  const elapsed = timestamp - timeStart;
  if (elapsed > duration) {
    endAnimation();
    return;
  }

  // 暂时省略计算过程

  if (elapsed < duration) {
    if (onframe) {
      onframe(t);
    }
    this.#landmarkAnimationID = requestAnimationFrame(animate);
  }
};
requestAnimationFrame(animate);
使用之前的缓动函数得到时间值,然后使用 vec2.lerp 进行插值得到当前的相机参数,最后应用给相机更新矩阵:
// use the same ease function in animation system
const t = EASING_FUNCTION[easing](elapsed / duration);

const interPosition = vec2.create();
const interZoomRotation = vec2.fromValues(1, 0);

vec2.lerp(interPosition, [this.#x, this.#y], destPosition, t);
vec2.lerp(interZoomRotation, [this.zoom, this.#rotation], destZoomRotation, t);

this.#x = interPosition[0];
this.#y = interPosition[1];
this.#zoom = interZoomRotation[0];
this.#rotation = interZoomRotation[1];
this.updateMatrix();
这里还有一个小优化点,过程中可以计算相机位置的偏移量,如果距离小于阈值则没必要进行后续的动画了,直接结束:
const dist = vec2.dist(interPosition, destPosition);
if (dist <= EPSILON) {
    endAnimation();
    return;
}
回到页面顶部的例子试试吧,点击按钮回到相机的初始状态。